
10 DIY Textured Wall Art Aesthetic
Creating textured wall art at home allows you to design aesthetic pieces that feel personal, budget friendly, and visually striking. Textured art adds dimension, movement, and warmth to a room, making even a simple wall look curated. Many people assume that textured art requires professional tools or expensive materials, but most techniques can be completed with items you already have such as joint compound, cardboard, spackle, fabric, rope, or plaster. The following guide covers ten detailed textured wall art projects that are easy to create and suitable for many decor styles such as modern, minimalist, boho, neutral, and contemporary. Each idea includes preparation, materials, and step by step instructions so you can complete the artwork confidently. These projects work well for bedrooms, living rooms, offices, hallways, or small spaces that need visual impact without overwhelming the room. The textures created in these pieces allow light and shadow to play across the surface, giving the art depth and a calm aesthetic. Below are ten complete project breakdowns for diy textured wall art that you can create with minimal cost and maximum creativity.

1. Joint Compound Minimalist Texture Canvas
Creating a minimalist textured canvas with joint compound is one of the easiest ways to achieve aesthetic wall art that looks designer quality while staying budget friendly. Start by preparing your workspace with a flat surface covered with newspaper to protect from spills. The main material used is joint compound, also known as wall putty or drywall mud. This can be purchased at any hardware store for a low cost. You also need a canvas, a putty knife, and optional paint for finishing. Begin by applying a thin layer of joint compound to the canvas with your putty knife. Spread it evenly, then add deliberate strokes to create texture. You can form arches, lines, curves, or waves depending on the aesthetic you prefer. Allow the compound to dry completely which can take several hours or overnight. Once dry, lightly sand any rough edges if needed. Finally, paint the canvas with a neutral tone such as beige, white, or soft gray to enhance the texture without overpowering it. This type of artwork suits modern interior styles and adds depth to even the simplest wall arrangement. It is ideal for beginners because it requires minimal materials and offers freedom to experiment with patterns.

2. Sculpted Plaster Line Art Canvas
Sculpted plaster line art creates an elegant piece that mimics expensive gallery artwork. To begin, prepare a clean workspace and gather plaster of paris, water, a disposable bowl, a mixing stick, and a raised canvas or wooden panel. Mix the plaster according to package instructions until it forms a thick paste that can be molded but not runny. Transfer the plaster into a piping bag or a plastic sandwich bag with a small opening cut at the tip. Draw your design onto the canvas lightly with a pencil. Common motifs include abstract faces, continuous lines, organic shapes, or botanical outlines. Pipe the plaster directly onto the pencil lines, keeping the pressure even to maintain consistent thickness. Work slowly to ensure the lines stay smooth and connected. Allow the plaster to dry completely which may take several hours. Once hardened, paint the artwork with a matte finish paint or leave it natural for an organic and sculptural appearance. This type of textured art is visually striking and suits minimalist or Scandinavian inspired décor. The piece has dimension and artistic appeal but remains neutral enough to blend into various room styles. The simplicity of the line art combined with the raised plaster makes it feel timeless and calming.

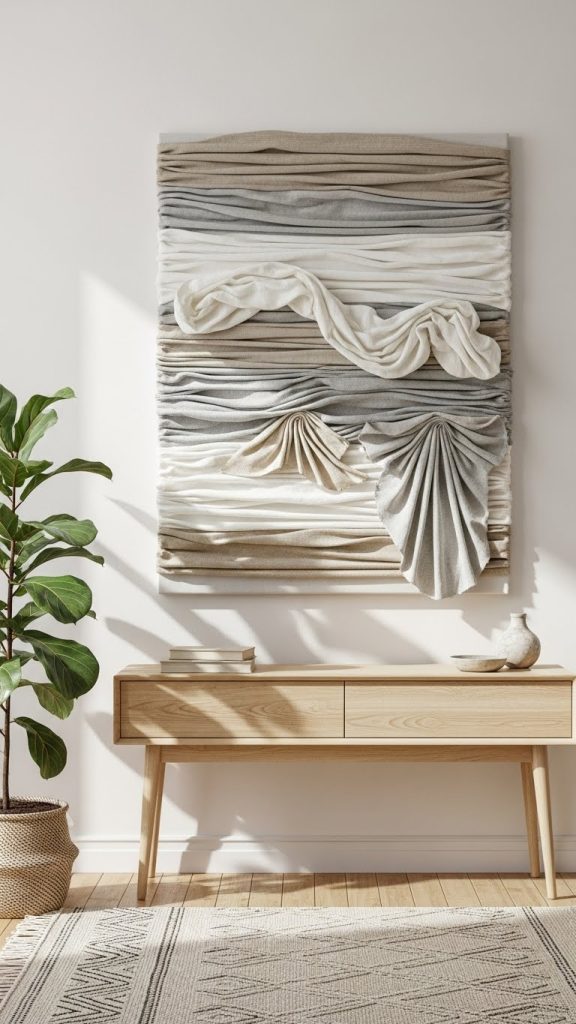
3. Fabric Fold Texture Wall Art
Fabric fold art is an excellent method for creating rich texture using leftover materials such as cotton, canvas fabric, muslin, or linen. Begin by selecting a sturdy backing such as stretched canvas or a wooden board. Gather fabric scraps, scissors, strong glue, and paint if you plan to change the fabric color. Prepare the canvas by ensuring the surface is clean and free from dust. Cut long strips or square pieces of fabric and experiment with folding, pleating, or twisting them into organic shapes. Popular styles include rippled waves, soft vertical pleats, or layered folds that resemble drapery. Once you achieve a shape you like, glue the fabric firmly onto the canvas and press for several seconds to secure. Continue adding layers to build dimension and create movement. When the design is complete, allow the glue to dry fully. You may paint over the fabric with acrylic paint for a uniform aesthetic, or leave the natural fabric color for a rustic and soft look. The tactile quality of the folds adds warmth and softness to any space. This project works well for neutral or boho decor and is ideal for repurposing leftover material while creating a custom art piece that feels luxurious and textured.
4. Rope and Jute Texture Panel
Rope and jute texture art is perfect for achieving a natural and earthy aesthetic. Start by gathering jute rope, cotton rope, or twine in varying thicknesses, along with a canvas, crafting glue, and scissors. Begin by planning your design which can be geometric patterns, spirals, waves, or random abstract shapes. Measure and cut rope pieces before attaching them to the canvas to ensure accuracy. Apply glue in small sections to prevent drying before you place the rope. Firmly press the rope onto the surface and follow your pattern carefully. If creating spirals, start from the center and work outward. For geometric designs, align the pieces symmetrically to maintain consistency. Once all rope is attached, allow the glue to dry fully. Some creators choose to paint the rope for a monochromatic look, while others prefer keeping the natural color to emphasize the organic texture. This art style works well in boho, coastal, or rustic interiors and adds tactile interest to otherwise plain walls. The rope material brings an earthy, grounded feel and is perfect for creating a warm atmosphere. The project is simple yet rewarding and suitable for beginners or experienced crafters looking to incorporate natural textures into their decor.

5. Cardboard Layered Texture Art
Cardboard is one of the most affordable materials for textured wall art and can be transformed into stunning layered designs. Start by collecting sturdy cardboard from old boxes. Flatten the pieces and smooth out any dents. You will need scissors or a craft knife, glue, paint, and a canvas or wooden backing. Begin by designing shapes such as arcs, rectangles, waves, or abstract patterns. Cut multiple layers of cardboard in similar shapes but varying sizes to create a dimensional effect. Arrange the pieces on your canvas before attaching to ensure the layout looks balanced. Once satisfied, glue each layer carefully, stacking them to create depth and shadow. After the glue dries, paint the entire piece with a solid color to unify the layers and enhance the sculptural quality. White, cream, beige, and gray are popular choices for modern interiors. Cardboard art is lightweight and easy to customize, making it ideal for large scale pieces or gallery walls. The layered effect adds structure and visual interest while keeping the overall aesthetic clean and minimal. This project is excellent for anyone seeking a budget friendly way to create modern textured decor at home.

6. Spackle Knife Texture Canvas
Spackle texture canvas art uses basic wall spackle to create dynamic patterns. Begin with a canvas, spackle paste, a putty knife, and optional paint. Lay the canvas flat and spread a generous amount of spackle across the surface. Choose the direction and style of your texture such as horizontal strokes, crosshatch patterns, circular motions, or random organic movements. Experiment with different knife angles to achieve varied thickness and depth. You can also drag the knife lightly across the surface to create thin lines or press harder for bold texture. The advantage of spackle is that it dries with a matte, stone like finish which looks high end. Allow the canvas to dry thoroughly before painting. For a minimal look, keep the piece white or choose soft neutral tones. For a more dramatic effect, apply a darker shade and layer lighter dry brush strokes over raised areas. This technique works well in modern and contemporary interiors and is versatile enough to complement various design themes. It is a beginner friendly project that requires minimal materials while offering full creative freedom to shape the texture.

7. Sand Texture Mixed Media Art
Sand texture adds a gritty, earthy aesthetic that pairs beautifully with natural or coastal interior themes. Gather fine sand, glue or gesso, a canvas, paint, and a mixing bowl. Begin by mixing sand with glue or gesso to create a thick paste that can be spread easily. Prepare the canvas by ensuring the surface is clean and laid flat. Apply the sand mixture using a palette knife, spreader, or even your fingers for organic texture. You can create patterns such as dunes, waves, geometric shapes, or abstract formations. Allow the mixture to dry completely which may take several hours. Once dry, paint the surface with neutral or warm tones that highlight the natural texture. You may choose to leave some areas of raw sand visible for added authenticity. The finished artwork has a tactile surface that reflects light beautifully and adds character to a room. This technique is ideal for diy enthusiasts who enjoy earthy textures and want to incorporate natural elements into their decor. It is inexpensive, environmentally friendly, and easy to customize based on your preferred aesthetic.

8. Tissue Paper Texture Art
Tissue paper texture art is a simple and creative project that uses everyday materials to build depth and movement. Gather tissue paper sheets, glue, a canvas, paint, and a brush. Begin by tearing tissue paper into random shapes or strips. Apply a thin coat of glue to the canvas and press the tissue pieces onto the surface, scrunching or folding them slightly to create texture. Continue layering until the canvas is covered and uneven in a visually pleasing way. Once dry, paint over the tissue paper with acrylic paint. Light colors emphasize the gentle peaks and valleys of the texture, while darker tones create dramatic shadows. This project is excellent for beginners because it allows artistic freedom without complex tools. The final result resembles soft plaster or aged parchment and adds a calming and aesthetic appeal to any room. It works well in bedrooms, hallways, or living rooms where subtle texture enhances the decor without feeling overwhelming. Tissue paper art is highly customizable and can be adapted to small or large canvases.

9. Clay Relief Sculpted Art
Clay relief art offers a more sculptural approach to textured wall art and allows you to create raised forms such as leaves, flowers, waves, or abstract shapes. To start, gather air dry clay, a rolling pin, sculpting tools, glue, and a canvas or wooden board. Roll out the clay to an even thickness and cut shapes that suit your design. Use sculpting tools or your hands to add details. Once shaped, let the clay pieces partially dry so they are firm but still flexible. Attach them to the board using strong glue and press gently to secure. Arrange the pieces in a way that creates movement and depth. After the clay fully dries, paint the artwork with a matte finish to highlight the sculptural quality. This method produces a gallery style effect that feels artistic and luxurious. Clay relief art fits well in modern, neutral, or organic themed spaces and offers endless design possibilities. It requires patience but is highly rewarding due to the detailed and dimensional result it produces.

10. Stucco Texture Wall Art Panel
Stucco texture art creates a high end aesthetic with a rustic yet modern appeal. Begin by gathering premixed stucco, a canvas or wood panel, a trowel or putty knife, and optional paint. Apply a thick layer of stucco to the surface using sweeping or irregular motions. This material is ideal for creating bold texture such as raised peaks, rough patches, or smooth transitions. You can carve patterns into the stucco while it is still wet or leave it naturally uneven. Allow ample time for drying as stucco takes longer to cure than spackle or joint compound. Once completely dry, paint the surface with a soft matte color for a refined look or leave it raw for a natural finish. Stucco adds character and depth to a room and works particularly well in Mediterranean, rustic, or contemporary interiors. It is a durable material that creates a long lasting textured artwork that can easily become the focal point of the room.
