
10 DIY Textured Vase Aesthetic
Creating textured vases at home is one of the most rewarding ways to enhance your interior decor without spending too much. Textured vases add depth, warmth, and visual charm to any room, and the best part is that they can be made using simple household materials. Whether you prefer earthy finishes, rustic styles, modern patterns, or soft sophisticated textures, there is a technique that matches your creative expression. In this comprehensive guide, you will explore ten unique methods to transform plain glass or ceramic vases into beautiful textured pieces. Each method will explain the preparation process, recommended materials, application techniques, and important tips for creating a high quality finish. With patience and creativity, you can craft decor pieces that look store bought and blend seamlessly with your aesthetic. This guide aims to help beginners and crafting enthusiasts develop confidence in working with different texturing mediums and decorative approaches. By the end, you will have a full understanding of how to achieve professional level results using simple tools and accessible materials. Let us explore these inspiring and achievable textured vase projects.

1 Clay Wrap Textured Vase
A clay wrap textured vase is an excellent project for adding an organic handmade look to a simple container. To begin, you will need air dry clay, a rolling pin or bottle for flattening, a craft knife, sandpaper, and a clean vase. Start by cleaning the vase to ensure the clay adheres properly. Roll out the clay into an even sheet, making sure it is slightly thicker than the final texture you want. Carefully wrap the clay around the vase, trimming excess clay and smoothing seams with a bit of water. Press gently to ensure the clay sticks firmly to the surface. This technique allows you to create patterns such as ridges, waves, or minimalist lines by scoring the surface before the clay dries. Once the clay is completely dry, lightly sand the surface to refine imperfections. Finish by painting with acrylic paint or leaving it natural for a raw earthy appearance. Seal with a matte or satin varnish for durability. This method offers creative freedom and produces an artisanal look that complements soft neutral or bohemian interiors.

2 Baking Soda Paint Textured Vase
Baking soda paint is one of the easiest and most popular ways to achieve a ceramic like texture on any vase. The mixture is made by combining acrylic paint with baking soda, which creates a grainy matte finish once applied. Begin by thoroughly cleaning your vase to remove dust or oils. Choose your desired paint color and slowly add baking soda while stirring until the mixture becomes thick and creamy. The more baking soda you add, the stronger the texture will appear. Use a soft brush to apply long even strokes, allowing the mixture to build texture naturally. For an extra rustic finish, add a second or third layer once the first coat dries. You can also apply the paint using a dabbing motion with a sponge to create subtle peaks and depth. Once dry, the vase will resemble handmade pottery. It works well in minimalist, Scandinavian, farmhouse, and organic style interiors. This approach is cost effective, beginner friendly, and produces impressive results using materials already available at home.

3 Sand and Paint Textured Vase
Creating a sand and paint textured vase results in a coarse, natural surface that resembles stone or coastal decor. To start, collect fine sand, acrylic paint, strong glue, a stirring stick, and a clean vase. Mix the paint with a small amount of sand, then add glue to strengthen the texture and help the mixture adhere to the surface. Adjust the sand quantity depending on the level of roughness you want. Use a brush with firm bristles to apply the mixture, moving in consistent strokes to avoid clumps. For a more dramatic stone effect, lightly sprinkle dry sand over the wet paint mixture before it dries. Once the first layer has dried completely, apply a second coat for durability. This technique is ideal for creating vases that complement coastal, rustic, or desert inspired interiors. The final look is naturally textured and holds up well over time. If you prefer a more refined finish, gently sand the surface once dry to soften the roughest peaks while keeping the organic feel intact.

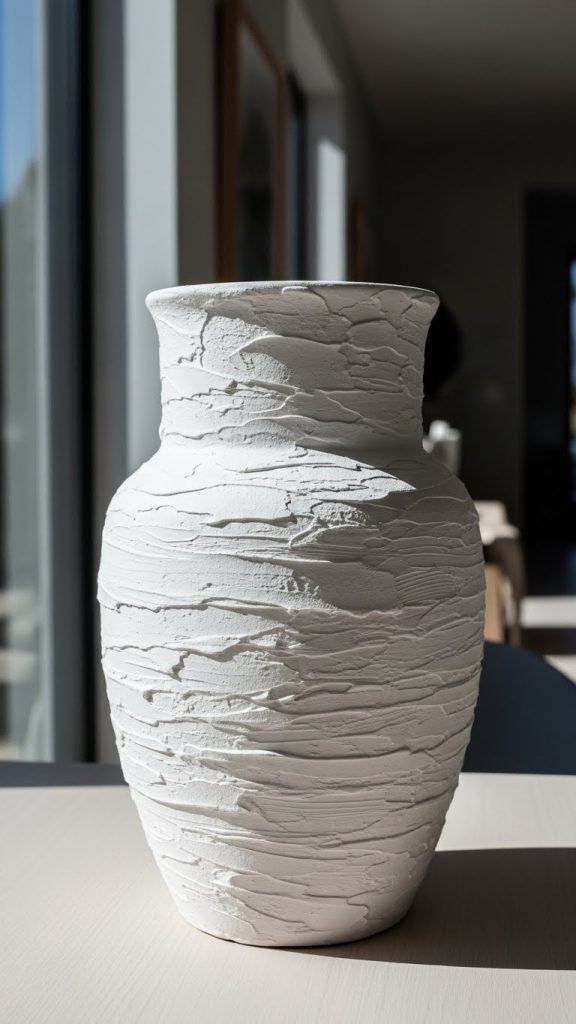
4 Joint Compound Plaster Vase
Using joint compound or plaster is a classic technique for thick, dramatic texture. Begin by gathering joint compound, a putty knife, fine grit sandpaper, and a clean vase. Apply a thin layer of compound using the putty knife, spreading it evenly or intentionally creating rough patches for artistic texture. Joint compound gives you freedom to experiment with strokes, swirls, and raised patterns. Once the first coat dries, evaluate whether you want more dimension and apply additional layers as needed. After everything dries completely, gently sand some areas to balance the texture while keeping depth where desired. Paint the vase using matte or chalk paint for a luxurious finish. This method works beautifully for modern, farmhouse, and sculptural decor themes. The final appearance is substantial and resembles high end ceramic artwork. Sealing the vase with clear matte sealant is recommended to enhance durability. This technique transforms inexpensive containers into gallery style decor pieces.
5 Rope Wrapped Textured Vase
A rope wrapped textured vase adds warmth, nature inspired accents, and a handmade aesthetic to your space. To begin, you will need jute rope, hot glue, scissors, and a clean vase. Start at the base of the vase by applying a bead of glue and pressing the rope firmly into place. Slowly wrap the rope around the vase, working upward while keeping the coils tight and even. Apply glue periodically to maintain adhesion. You can cover the entire vase for a fully textured rustic look or leave sections exposed for a modern mixed material design. For additional dimension, experiment with thicker rope, braided rope, or alternating rope sizes. Rope texture pairs well with earthy interior themes and enhances the natural look of dried flowers or pampas grass. This project is beginner friendly and inexpensive, yet the result looks stylish and cozy. For added durability and easier cleaning, lightly spray the finished vase with a clear sealant.

6 Spackle Dab Textured Vase
The spackle dab method uses lightweight spackle to create a soft, cloudlike texture that feels decorative and artistic. Gather lightweight spackle, a small spatula, a brush, and paint. Begin by cleaning your vase thoroughly. Use the spatula to apply small dabs of spackle in random patterns around the vase. Do not attempt to make the dabs uniform because the charm comes from their natural variation. As the spackle begins to set, use a damp brush to soften or blend areas depending on the effect you want. Once dry, the surface will have a soft stone or chalky feel. Add paint in light coats to avoid flattening the texture. Neutral colors like white, gray, or beige enhance the soft aesthetic created by the spackle. This technique works well for subtle decor pieces that add quiet elegance. It pairs nicely with minimalist, romantic, and soft vintage inspired themes. Seal the vase for longevity and moisture protection.

7 Tissue Paper Textured Vase
A tissue paper textured vase is an affordable and versatile technique that creates a crinkled, fabric like texture. Gather tissue paper, mod podge or white glue, a brush, and paint. Begin by tearing tissue into irregular pieces because uneven edges create a more artistic texture. Apply a thin glue layer onto the vase and gently press tissue pieces onto the surface, allowing them to wrinkle naturally. Continue layering until the entire vase is covered. Once dry, apply another layer of glue over the tissue to secure it and harden the texture. After the surface is fully dry, paint the vase using acrylic or spray paint. Lighter colors highlight the texture, while darker shades create dramatic shadow effects. This technique works well for decorative accents in bohemian, eclectic, or artistic interiors. The resulting finish is lightweight, durable, and visually striking. You can add dry brushing techniques to enhance texture depth.

8 Concrete Textured Vase
A concrete textured vase gives a contemporary industrial aesthetic to your decor. To create this look, you will need concrete mix, water, a mixing container, sandpaper, and a vase. Start by mixing the concrete until it reaches a smooth but spreadable consistency. Use a gloved hand or spatula to apply a thin coat to the vase, pressing gently to ensure adhesion. Allow the layer to dry before deciding whether additional coats are needed for more density. For a rough industrial look, leave the surface unpolished. For a smoother stone finish, lightly sand the dry concrete. Concrete texture fits perfectly in modern urban, industrial, and minimalist spaces. It creates a strong visual impact and pairs well with metal accents or neutral color palettes. Seal the vase with a concrete sealer to prevent crumbling and to enhance longevity. This technique produces a bold sculptural piece that looks professionally crafted.
9 Fabric Textured Vase
Using fabric to create texture allows you to add softness and textile inspired patterns to your vase. Begin with fabric strips or textured cloth, mod podge or glue, scissors, and paint. Start by cutting the fabric into desired shapes or strips. Apply glue to the vase and wrap or press the fabric onto the surface. You can overlap fabrics, create pleated effects, or form geometric patterns depending on your decorating goals. Once the fabric adheres securely, apply another coat of glue to stiffen it and create a firm texture. After drying, paint the vase if you want a uniform color or leave the fabric natural for an organic look. This technique is ideal for cozy, cottage, or shabby chic decor styles. It brings a blend of texture and warmth that pairs well with soft furnishings and layered interiors. The finished vase becomes a statement piece that combines structure with gentle textile appeal.

10 Painted Stucco Textured Vase
A stucco textured vase uses a premixed stucco or thick paint paste to create a Mediterranean inspired finish. Begin by gathering stucco paste, a palette knife, a brush, and optional chalk paint. Clean your vase and apply the stucco paste using sweeping motions with the palette knife. You can create smooth waves, rough patches, or raised strokes depending on the aesthetic you want. Once dry, the texture resembles handcrafted pottery found in coastal or desert homes. Paint the vase with matte colors to highlight the stucco dimension. Warm tones such as sand, ivory, or terracotta enhance the Mediterranean feel. This technique is excellent for creating elegant textured decor pieces that appear high end. Adding a sealant helps maintain durability and ensures the texture remains intact.
