
10 DIY Small Closet Organizer ideas
A small closet can feel overwhelming when clothing, accessories, and everyday essentials start piling up. Limited space does not mean limited potential. With the right planning, simple tools, and creative organization ideas, you can transform even the smallest closet into a functional, tidy, and easy to use storage area. This detailed blog post explores ten practical and budget friendly DIY ideas to maximize space in a small closet. Every idea includes preparations, materials needed, and step by step guidance to help you achieve better storage without expensive renovations. Whether you are organizing a bedroom closet, hallway closet, or shared storage area, these ideas will help you create more room and maintain long term order. Each idea is explained in about two hundred words to ensure clarity and helpful detail.

Idea One
DIY Vertical Shelf Dividers for Organized Stacks
Vertical shelf dividers are perfect for keeping folded clothes, towels, or handbags neat and separated, especially in a small closet where stacks often collapse. Before starting this project, clear your closet shelf and measure the depth, height, and spacing. Purchase materials such as thin plywood boards or foam board, sandpaper, adhesive strips, measuring tape, and paint if you want a polished finish. Cut the boards according to your measurements, ensuring the divider fits snugly without forcing it into place. Lightly sand the edges for a smooth look. If desired, paint the dividers to match your closet interior. Once dry, attach adhesive strips to the bottom and back edges of the divider. Position each divider upright on your shelf to create separate sections for sweaters, jeans, or accessories. This method prevents items from tilting or mixing together, making it easier to see what you own. The dividers help maintain consistent categories and prevent clutter from forming again. This DIY idea is affordable, quick to install, and can be customized to match any closet style.
Idea Two
Hanging Rod Extender for Double Storage
A hanging rod extender is an excellent DIY solution for increasing your closet’s hanging capacity without any major installation. This project works especially well in closets with tall vertical space where the upper zone often goes unused. Start by measuring the width of your existing closet rod. For materials, you will need a sturdy chain or rope, hooks, and a second lightweight metal rod or wooden dowel. Attach hooks securely to both ends of the lower rod. Cut two equal lengths of chain or rope and connect them to the hooks. Hang the chain over the original closet rod and adjust the length so the lower rod sits at a comfortable height. Make sure both sides are even and the rod hangs straight. This added section gives you extra room for shirts, skirts, or kids clothing while the upper rod remains available for longer garments. The rod extender works without drilling or complex tools, making it completely reversible and renter friendly. It is a clever way to double your hanging space while keeping your closet accessible and tidy. With the extra rod, sorting categories becomes easier and the entire closet feels more spacious and organized.

Idea Three
Over the Door Pocket Organizer for Small Items
An over the door pocket organizer maximizes unused space and prevents clutter on shelves and closet floors. This idea works well for storing shoes, scarves, belts, accessories, or even folded shirts depending on the pocket size. Begin by measuring the width and height of your closet door to ensure the organizer fits properly. Store bought options are common, but you can also make one using fabric, clear vinyl, or canvas. For a DIY version, cut fabric panels and stitch them into rows of pockets. Reinforce the top with a firm strip of cardboard sewn into a pocket. Add metal grommets or reinforced buttonholes for hanging. Attach hooks to the top of the closet door and hang the organizer securely. Once installed, fill the pockets with items categorized by type. This system makes it easier to find small essentials that often get lost in drawers or baskets. Over the door organizers save shelf space while keeping frequently used items visible and accessible. They are especially valuable in small closets where every inch counts. This project blends creativity with practicality, ensuring a clutter free and efficient storage solution.

Idea Four
Under Shelf Hanging Baskets for Extra Space
Under shelf hanging baskets are a smart way to use the empty space beneath fixed shelves. These baskets slide onto the shelf edge and create an extra layer of storage. Start by measuring the thickness of your shelf to ensure the basket clips fit properly. You can purchase premade metal or plastic under shelf baskets or build your own using wire mesh, thin wooden boards, or metal rods bent into shape. For a DIY wooden version, create a U shaped frame with a flat base and side supports. Attach slim metal hooks or brackets that can slide over the shelf. Sand the edges smooth and paint if desired. Once installed, the basket becomes perfect for storing scarves, small bags, folded shirts, or even office supplies if used in a multi purpose closet. The main advantage is that it takes no floor space and keeps items organized in their own section. Under shelf baskets prevent clutter from building on the main shelf and improve visibility. This simple addition boosts your closet capacity instantly while maintaining easy access to your belongings.

Idea Five
DIY Drawer Inserts for Accessories
Small accessories like socks, undergarments, ties, or jewelry often get mixed and disorganized inside drawers. DIY drawer inserts help separate each item into its own space. Begin by measuring the interior of your drawer. Purchase thin wooden slats, cardboard, or foam board along with a ruler, cutter, and adhesive. Cut the pieces into long strips and assemble them into a grid. Adjust spacing based on the size of the items you want to store. Glue the joints to keep the insert sturdy. Once finished, place the insert inside the drawer and test that it fits securely. These compartments prevent items from shifting every time the drawer opens. You can also label the sections for easier use. Drawer inserts reduce clutter, save time, and keep everything visible at a glance. They are customizable, budget friendly, and simple to make at home. This DIY idea enhances closet organization by turning messy drawers into neatly arranged storage areas. It encourages consistent habits and makes the closet feel more streamlined and functional.

Idea Six
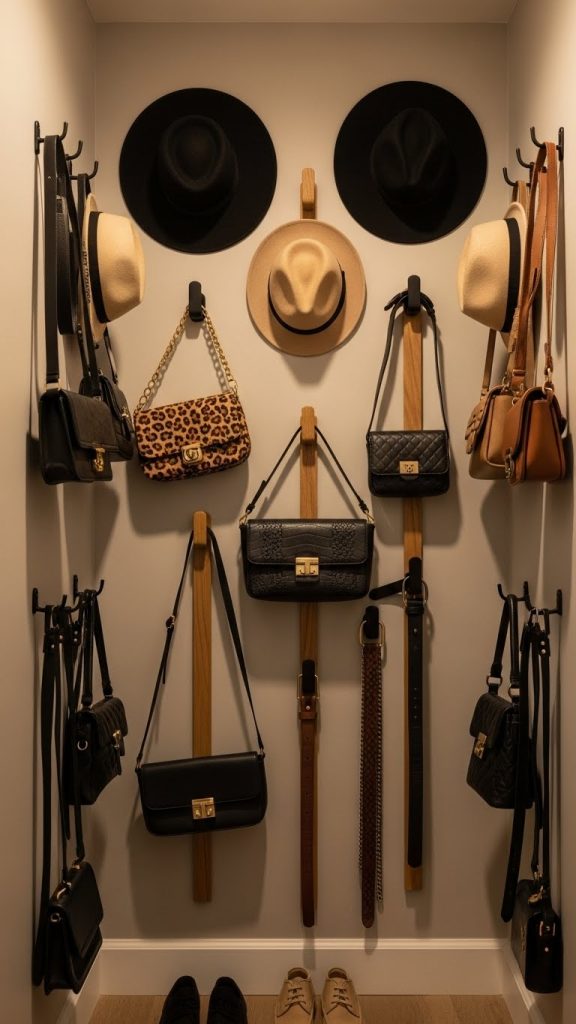
Floating Hooks for Bags and Accessories
Floating hooks create a clean and organized system for hanging bags, hats, belts, and other accessories on the closet wall or door. This idea uses unused vertical space and keeps items easily accessible. Begin by choosing an area inside the closet where hooks can be installed without interfering with clothing. Materials include adhesive hooks, screw in hooks, or decorative wall hooks depending on your preference. Clean the surface before applying adhesive hooks. For screw in hooks, use a small drill or screwdriver. Space the hooks evenly and at a height suitable for the items being stored. Once installed, hang your accessories and categorize them by type. Floating hooks prevent items from piling up on the closet floor and help preserve the shape of handbags. They also make your closet look visually appealing and structured. This simple solution saves space while keeping everything you need within reach. Floating hooks are affordable and easy to customize, making them one of the most efficient ways to maximize small closet storage.
Idea Seven
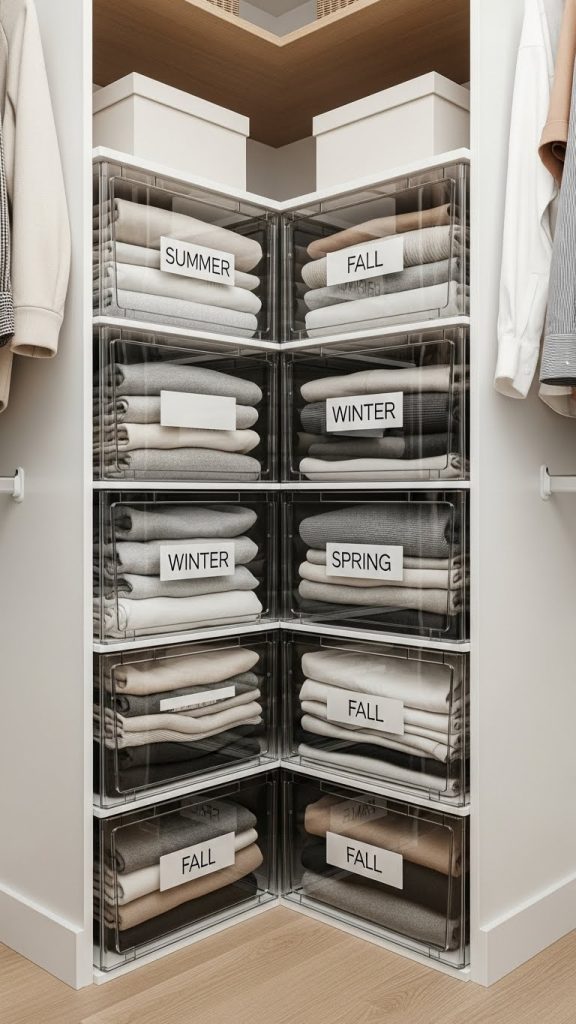
Stackable Storage Bins for Seasonal Clothes
Stackable bins are essential for organizing seasonal items or pieces you do not use daily. Before starting, sort your clothes into categories such as winter wear, summer items, formal outfits, or off season accessories. Choose bins that fit your closet dimensions. Clear plastic bins are helpful because they allow you to see the contents without opening them. Alternatively, you can use wooden or fabric bins for a more aesthetic look. Label each bin clearly to make retrieval easier. Stack the bins vertically, placing the heaviest ones at the bottom. Store less frequently used items on the top. This system keeps your closet floor tidy and opens space for everyday essentials. Stackable bins protect clothes from dust and moisture, especially if your closet lacks ventilation. They help streamline your wardrobe and maintain a clean environment. This DIY storage method is simple but highly effective for keeping your closet orderly year round.
Idea Eight
Slim Hangers to Maximize Hanging Space
Slim hangers are an inexpensive upgrade that can significantly increase the amount of space available on your closet rod. Thick plastic hangers often consume unnecessary room, making the closet feel cramped. Replace them with slim felt or metal hangers that allow more garments to fit neatly side by side. Begin by removing all clothes from the closet and sorting them. Purchase a pack of slim hangers in a uniform style for a clean look. Carefully transfer each item onto the new hangers. The uniform thickness helps garments hang evenly without bulk. Felt hangers also prevent clothes from slipping. This simple switch improves visibility and organization while creating a cohesive appearance. Slim hangers are also lightweight and durable, making them a long lasting closet upgrade. They help store more clothing in a smaller space and keep everything wrinkle free and neatly aligned. This idea is ideal for anyone wanting a quick and affordable way to enhance their small closet.

Idea Nine
DIY Shoe Rack for Footwear Management
A compact shoe rack helps maintain order and prevents shoes from cluttering the closet floor. You can build a simple rack using wooden boards, PVC pipes, or metal rods. Begin by measuring your closet width to ensure the rack fits comfortably. For a wooden version, cut two side panels and several horizontal slats that will act as shelves. Assemble the frame using screws or strong wood glue. Sand the edges smoothly and paint if desired. Once ready, place the rack at the bottom of your closet. Arrange shoes by category such as daily wear, formal, or seasonal options. This system makes it easier to find footwear quickly and keeps the floor clear for additional storage. A DIY shoe rack is customizable and cost effective. It uses vertical space efficiently by stacking multiple rows of shoes in a compact area. This project enhances the overall appearance of your closet while ensuring footwear stays clean and organized.

Idea Ten
Shelf Risers for Double Level Storage
Shelf risers are small platforms that create additional layers on your shelves. They help maximize vertical space and keep items neatly separated. You can purchase ready made risers or build your own using plywood, small wooden legs, and screws. Measure your shelf width and height to determine the right riser size. Cut a wooden board for the top platform and attach short legs or blocks beneath it. Sand the surface smooth and paint if needed. Once finished, place the riser on your shelf and test its stability. Use the new upper layer for smaller items like accessories, folded shirts, or storage boxes while keeping larger items beneath. Shelf risers help you store more without overcrowding the shelf. They improve visibility and organization by separating categories into easily accessible sections. This DIY addition is simple and budget friendly, making it an excellent option for small closets needing extra functionality.
