
10 DIY Home Decor ideas
Creating beautiful home decor does not always require expensive purchases or professional services. With a bit of creativity, simple tools, and accessible materials, you can transform any corner of your home into a stylish and meaningful space. DIY home decor projects allow you to personalize your interior, experiment with different textures and colors, and create unique elements that reflect your personality. In this detailed blog post, you will find ten DIY home decor ideas explained thoroughly. Each idea includes materials, preparation steps, and a clear explanation of the concept to help you achieve the best results.
These decor ideas are designed for beginners and experienced DIY enthusiasts alike. They emphasize affordability, sustainability, and ease of execution. Whether you want to refresh your bedroom, brighten your living room, or enhance your entryway, the following ideas offer practical ways to elevate your space through hands on creativity.

1. DIY Wall Art Using Painted Canvas
Creating your own painted canvas wall art is one of the simplest and most effective ways to personalize your space. This project allows you to choose colors, patterns, and styles that perfectly match your decor theme. To begin, gather materials such as blank canvases in your desired size, acrylic paints, paintbrushes, painter tape, and a protective cover for your floor or table. Make sure your workspace is well lit and ventilated. Before starting, plan out your design by sketching it lightly on paper. Whether you prefer abstract strokes, geometric shapes, or soft gradients, a clear plan will help you stay focused.
Start by applying a base coat of paint and allow it to dry completely. Then add additional layers, shapes, or patterns using painter tape to achieve sharp lines if needed. Work slowly and patiently since acrylic paint dries quickly. Once finished, let the canvas dry for several hours before hanging it. This DIY art adds personality and charm to any room. The best part is that you can easily update or replace the artwork whenever you want a fresh look. It is a budget friendly project that requires minimal skill and delivers maximum visual impact.

2. Handmade Macrame Wall Hanging
Macrame is a timeless art that continues to gain popularity due to its minimalistic style and natural aesthetic appeal. A handmade macrame wall hanging brings warmth and texture to your space, especially in living rooms and bedrooms. To prepare for this project, gather supplies including cotton macrame cord, a wooden dowel, measuring tape, scissors, and a flat working surface. Begin by cutting equal lengths of cord based on the size of your desired wall hanging. Secure the cords onto the dowel using simple knots.
Before starting the design, familiarize yourself with basic macrame knots such as the square knot and the half hitch knot. These knots form the foundation for most patterns. Create your hanging by alternating knot patterns and varying the lengths of the cords to add dimension. Take your time and keep the cords untangled to ensure a neat result. When completed, trim the ends evenly or shape them into a V or wave pattern.
This project is affordable and relaxing, and the final product looks like a store bought decor piece. Macrame adds a cozy bohemian charm to your home and is adaptable to various interior styles, from rustic to modern. It also makes a meaningful handmade gift for friends and family.

3. Decorative Glass Jar Lanterns
Transforming simple glass jars into decorative lanterns is an enjoyable and eco friendly DIY idea that enhances both indoor and outdoor spaces. You will need empty glass jars in various sizes, twine or wire, acrylic paint, paintbrushes, tea light candles, and optional decorative items like beads or dried flowers. Begin by cleaning the jars thoroughly and removing any labels. Let them dry completely before applying paint or adhesive decorations.
If you want a frosted appearance, mix white paint with water and apply it lightly inside the jar. For a stained glass effect, use vibrant glass paint on the exterior. You can also wrap twine around the mouth of the jar to create a rustic look or form a handle for hanging. Place a tea light candle or battery operated light inside the jar to complete the lantern.
These lanterns work beautifully for special occasions, romantic evenings, or everyday ambient lighting. They are budget friendly, customizable, and a great way to repurpose glass jars instead of discarding them. With a bit of creativity, you can design lanterns that match any color palette or theme, making them a versatile decorative accessory for your home.

4. DIY Floating Shelves
Floating shelves are a stylish and functional addition to any room. They provide extra storage space while maintaining a clean and modern appearance. Building your own floating shelves allows you to customize their length, depth, and finish to suit your needs. To begin, gather materials such as wooden boards, brackets or hidden shelf supports, sandpaper, wood stain or paint, screws, and a drill. Measure the area where you intend to install the shelves to ensure accurate sizing.
Start by sanding the wood to create a smooth surface. Apply wood stain or paint based on your desired finish. Allow it to dry completely before installation. Use a level to mark the exact position of the brackets on the wall, ensuring they are evenly spaced. Drill the brackets securely and mount the wooden board on top. For a cleaner look, you can use hidden shelf supports, which give the illusion that the shelf is floating without visible hardware.
These shelves are perfect for displaying books, small plants, photo frames, or decorative objects. They add personality to blank walls and offer practical storage solutions. DIY floating shelves are cost effective and easy to maintain, making them an excellent project for enhancing any home environment.

5. Painted Terracotta Plant Pots
Painting terracotta pots is an enjoyable and creative way to add color and charm to your home decor. These pots are ideal for indoor plants, herbs, and succulents. To get started, gather terracotta pots, acrylic paint, paintbrushes, sealant spray, painter tape, and optional stencils. Clean the pots thoroughly to remove dust and allow them to dry before applying paint. Use painter tape to create geometric or striped patterns if you prefer a precise design.
Start with a base coat and let it dry completely. Apply additional patterns, designs, or color combinations based on your theme. Once your artwork is finished, use a sealant spray to protect the paint from moisture, especially if the pots will be used outdoors. Allow the sealant to dry thoroughly before placing soil and plants inside.
Painted terracotta pots are a versatile decor element that can be customized to match seasonal themes, color schemes, or interior styles. They are affordable and easy to create, making them perfect for beginners and children as well. Whether placed on windowsills, shelves, or garden tables, these hand painted pots add life and personality to any space.

6. Upcycled Wooden Crate Storage
Wooden crates can be transformed into attractive storage units or decorative shelves with minimal effort. This DIY project is perfect for those who value sustainability and enjoy giving new life to old materials. Gather wooden crates, sandpaper, wood glue or nails, paint or wood stain, a brush, and optional caster wheels. Begin by cleaning the crates thoroughly and sanding them to remove rough edges and splinters.
Decide how you want to use the crates, whether as a shelf, bedside table, or storage organizer. Arrange the crates based on your design and secure them using nails or strong wood glue. Once assembled, apply wood stain or paint based on your preferred finish. If you want the unit to be mobile, attach caster wheels to the bottom. Allow the paint or stain to dry completely before placing items inside.
These crates offer endless possibilities for customization and use. They add a rustic charm to your home while offering functional storage for books, toys, shoes, or decorative items. Upcycling crates not only enhances your decor but also reduces waste, making it an environmentally friendly choice.

7. DIY Fabric Cushion Covers
Creating your own cushion covers is a simple yet impactful way to refresh your home decor. This project allows you to choose fabrics that complement your furniture and personal style. To start, gather materials such as fabric of your choice, a measuring tape, scissors, pins, thread, and a sewing machine or needle. Measure your cushion inserts to determine the correct dimensions for your covers.
Cut the fabric into three pieces, one for the front and two for overlapping back panels, which make an envelope style closure. Pin the pieces together with the right sides facing inward. Sew along the edges, leaving an opening for inserting the cushion. Turn the cover right side out and insert your cushion to complete the project.
DIY cushion covers are versatile and budget friendly. You can experiment with patterns, textures, and colors to match different seasons or occasions. Whether you prefer bold prints, soft neutrals, or textured fabrics, handmade cushion covers offer endless creative possibilities. They are easy to wash and replace, allowing you to refresh your decor as often as you like.

8. Rustic Wooden Photo Frame
A handmade wooden photo frame adds a warm, rustic touch to your home and allows you to display cherished memories in a personal way. To create your own frame, gather wooden strips, a saw, sandpaper, wood glue, nails, a measuring tape, and paint or stain. Begin by measuring and cutting the wood strips to form the sides of the frame. Sand the pieces to smooth the edges.
Assemble the frame using wood glue and small nails for added strength. Allow it to dry completely before finishing it with paint or wood stain. You can keep it simple with a natural finish or add a distressed effect for a more vintage look. Attach a backing board and secure a hook or stand to display your frame.
This DIY project is affordable and customizable. It is perfect for displaying photographs, artwork, or inspirational quotes. The handmade frame adds character to your decor and is also a thoughtful gift option. Creating your own frame gives you complete control over size, color, and style, making it a meaningful addition to your home.

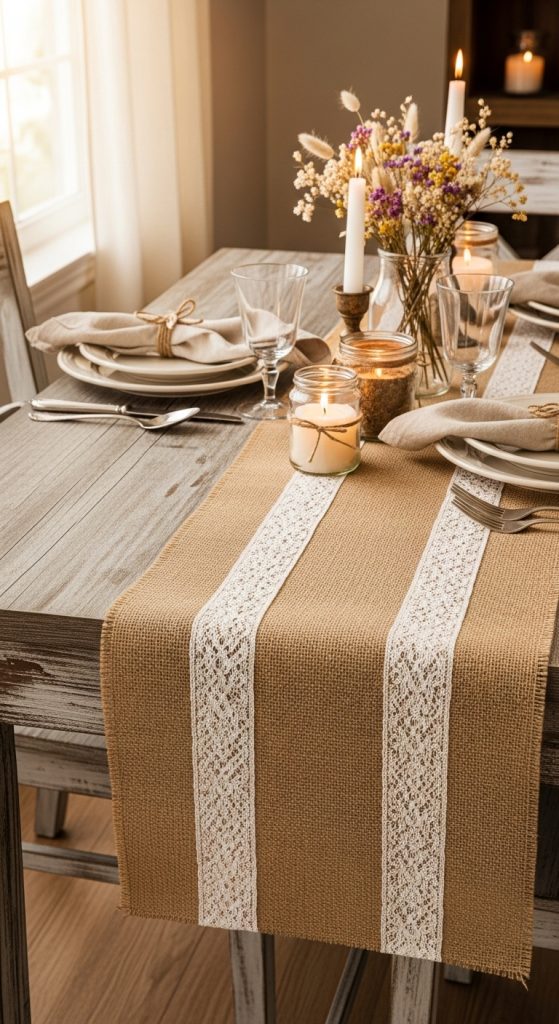
9. DIY Table Runner Using Burlap
A burlap table runner brings rustic elegance to your dining table, coffee table, or console. This simple fabric is durable, affordable, and easy to customize. To prepare for this project, gather burlap fabric, scissors, fabric glue or a sewing machine, lace trim or ribbon, and a measuring tape. Measure the length and width of your table to determine the appropriate size for your runner.
Cut the burlap to fit your measurements, leaving extra length if you want the runner to drape over the edges. If the edges fray, fold them inward and secure with fabric glue or stitch them using a sewing machine. Add decorative elements such as lace trim, ribbon, or fabric paint to match your decor theme.
Burlap table runners work well for rustic, farmhouse, or natural themed interiors. They are also perfect for special occasions such as family dinners, weddings, or seasonal celebrations. The natural texture of burlap adds warmth and charm to your space while allowing endless customization based on your creativity.
10. DIY Photo Collage Wall
Creating a photo collage wall is a wonderful way to personalize your home with meaningful memories. This project is easy, affordable, and highly customizable. Gather printed photos, picture frames, double sided tape or removable hooks, scissors, and a measuring tape. Choose a variety of photo sizes for a dynamic display. Before placing anything on the wall, plan your layout by arranging the photos on the floor.
Once satisfied with the arrangement, measure the spacing between photos to ensure an even and balanced look. Use removable hooks or double sided tape to attach the frames or photos to the wall. Accent the collage with decorative elements like small mirrors, wall decals, or inspiring quotes.
A photo collage wall adds emotion and personality to your home. It can be themed around travels, family moments, or artistic photography. This project is ideal for living rooms, hallways, or bedrooms. It allows you to showcase your style and memories while creating a visually appealing focal point.
