
10 DIY Crafts Room Decor
Creating a beautifully decorated room does not always require expensive store bought items. Many people enjoy crafting their own decor because it allows them to personalize their space while staying within a budget. DIY room decor is not only cost effective but also provides a sense of accomplishment and creativity. By using simple materials, recycling everyday household items, and applying a bit of imagination, you can transform any room into a warm and stylish environment.
In this blog post, you will find ten unique DIY room decor crafts. Each project includes preparation steps, materials needed, and detailed explanations to help you understand how to create each decor item successfully. Whether you enjoy minimalist designs, rustic themes, colorful styles, or modern aesthetics, these ideas can be adapted to suit your preferences. You can choose projects suitable for a bedroom, living room, office, or creative corner. Each section aims to guide you carefully so you can achieve impressive results without requiring professional crafting skills.

Let us explore these DIY crafts one by one.
1. DIY Fabric Wall Hanging
Fabric wall hangings are an excellent way to bring texture and warmth to any room. Unlike framed artwork, fabric hangings introduce softness and movement to a wall, creating a more approachable atmosphere. For this craft, you need a wooden dowel, cotton fabric or yarn, scissors, a measuring tape, and a hot glue gun. If you prefer, you can also use naturally dyed fabrics or old cloth scraps to create a sustainable piece. Preparation involves selecting the color scheme that matches your room. For example, earthy tones complement rustic spaces while bright colors suit modern or artistic rooms.
Cut the fabric into strips depending on your desired length. Tie each strip onto the wooden dowel in the pattern you choose. You can alternate colors or create an ombre design. Once completed, attach a string to both ends of the dowel to hang it on the wall. The project is simple yet impactful, and it allows you to express your style through colors and textures. It also works well above beds, sofas, or desks because it softens the look of sharp furniture lines. This craft is ideal for beginners and delivers a highly aesthetic finish.

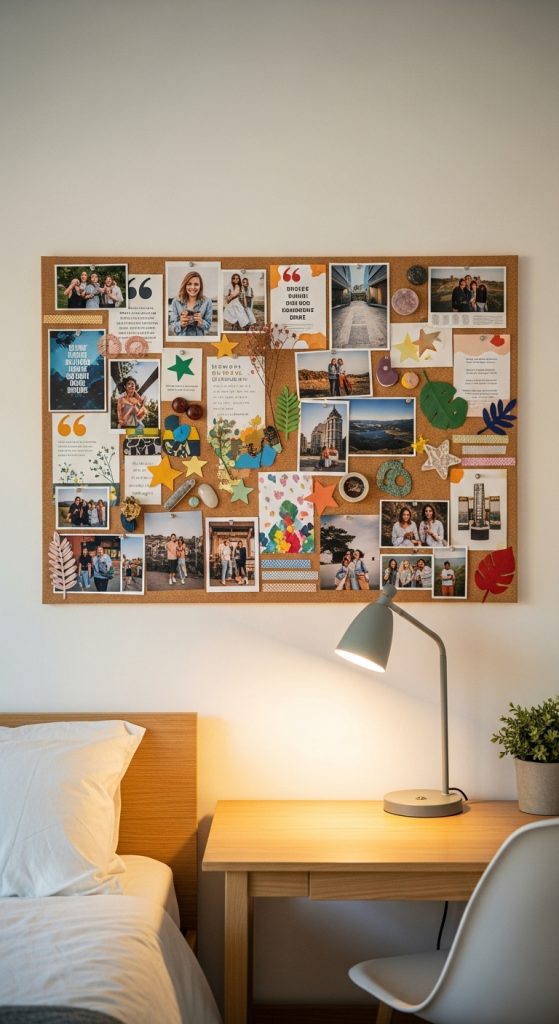
2. Handmade Photo Collage Board
A photo collage board adds a personal touch to any room by displaying memories, favorite quotes, or inspirational images. To create one, you need a corkboard or foam board, decorative paper, glue, scissors, and push pins or clips. Begin by choosing the board size based on your available wall space. You can also repaint the board or cover it with fabric to give it a customized appearance. Preparing the board surface ensures that your collage has a polished and cohesive look.
Next, print or gather photographs and small decorative elements. This can include tickets from events, dried leaves, or positive message cards. Arrange the photos on the board before permanently attaching them to find the ideal layout. Some people prefer symmetrical arrangements, while others enjoy a more free flowing, artistic design. Once satisfied, secure the items using glue or pins. This collage board can serve as a focal point in your room and can be changed or updated whenever you want. It is a practical and meaningful piece of decor because it reflects your personality and helps keep special memories visible. The process is enjoyable and encourages creativity while producing a sentimental decoration.
3. Painted Mason Jar Vases
Mason jars can be transformed into charming vases with just a few coats of paint. This craft works well for people who want to add floral accents or small storage containers to their rooms without buying new decor pieces. You will need mason jars, acrylic paint, brushes, sandpaper, and sealing spray. Start by cleaning the jars thoroughly to remove dust or labels. Preparation is important because it helps the paint adhere evenly to the surface.
Apply one or two coats of acrylic paint depending on your desired opacity. Soft pastel shades work beautifully for calming room themes while bold colors can complement more vibrant spaces. Once the paint dries, use sandpaper to gently distress the jar, giving it a rustic and vintage appearance. This step is optional but adds character to the finished product. Seal the paint with a protective spray to prevent chipping. The jars can be used to hold artificial flowers, real plants, pencils, or decorative feathers. They can also be arranged in a group to create a centerpiece. This project is inexpensive, customizable, and suitable for both beginners and experienced crafters.

4. DIY Floating Shelves
Floating shelves are both decorative and functional. They provide extra storage space while allowing you to display plants, candles, books, or small collectables. To make floating shelves, you need wooden boards, L brackets, screws, a drill, sandpaper, and wood paint or varnish. The preparation stage involves measuring your wall area to determine the shelf size. You can choose long, short, thick, or thin boards depending on the style you want.
Sand the wooden boards to create a smooth surface. You can then stain or paint them to match your room. Darker shades create a modern look, while natural wood tones suit rustic or minimalist themes. Once dry, attach L brackets to the wall using screws. Make sure they are level to avoid imbalance. Place the wooden board on the brackets and secure it. These shelves are versatile and can be installed in bedrooms, bathrooms, or entryways. They elevate the appearance of a room because they look clean and contemporary. They also help organize the space by keeping items off the floor or table. This DIY project requires simple tools and offers long lasting results.

5. Decorative Candle Holders
Candle holders add warmth and ambiance to any room environment. Creating your own allows you to control the design, color, and theme. You can use glass jars, wooden blocks, clay, or metal tins depending on your preference. Materials include paint, glue, beads, lace, or twine. Begin by cleaning your selected base. If you are using glass jars, remove any labels and ensure the surface is smooth. This preparation helps decorative materials adhere properly.
Next, choose your design. For a rustic style, wrap twine around the jar and secure it with glue. For a modern look, paint geometric patterns onto the surface. If you enjoy an elegant theme, attach lace or pearl beads. Once complete, place a small candle or LED light inside the holder. The soft glow creates a calming atmosphere and elevates the aesthetic of the room. Candle holders can be placed on shelves, bedside tables, or window sills. They are easy to create and can be customized for different seasons or events. This project encourages creativity because you can combine various textures and materials to achieve a unique style.

6. Painted Canvas Art
Canvas art is one of the simplest yet most impressive forms of DIY room decor. You do not need advanced painting skills to create a beautiful piece. Many people enjoy abstract designs because they are easy to paint and visually impactful. Materials include a blank canvas, acrylic or watercolor paint, brushes, painter tape, and a palette. Begin by deciding the color palette that matches your room. Preparation involves laying down a protective sheet on your workspace to avoid spills.
For geometric designs, use painter tape to create shapes across the canvas. Paint within the shapes and allow it to dry before removing the tape. For abstract art, blend colors using wide brushstrokes or sponge dabbing techniques. You can also try splatter painting for a modern and energetic look. Once the paint dries, you can add subtle details or leave it as a minimalist piece. Hanging your own artwork brings a personal touch to your room because it reflects your style and creativity. This project is ideal for people who want affordable wall art that looks professionally crafted. It is also a relaxing activity that encourages artistic expression.

7. DIY Rope Basket
Rope baskets are excellent for room organization and visual appeal. They can hold blankets, toys, throws, or accessories while doubling as a decorative accent. To make one, you need thick cotton rope, a hot glue gun, scissors, and a container to use as a mold. Preparation starts with selecting the basket size based on your needs. Choose a mold such as a bowl or plastic tub to help shape the rope.
Begin by coiling the rope tightly in a circular pattern, applying glue between each layer to secure it. Continue building upward by stacking the rope in a spiral form. Keep the coils even to maintain a polished look. Once you reach the desired height, remove the mold. You can attach handles made from smaller rope sections if you want a functional basket. Rope baskets add natural texture and warmth to a room. They fit well with coastal, bohemian, or minimalist themes. This DIY craft is durable and holds its shape well. It also offers a stylish solution for reducing clutter and improving room organization.

8. DIY Decorative Mirrors
Mirrors enhance the brightness and depth of a room by reflecting light. A decorated mirror can become a focal point on a wall or serve as a practical and aesthetic piece near a dresser. For this craft, you need a plain mirror, glue, decorative elements such as shells, beads, wooden sticks, or mosaic tiles, and measuring tools. Preparation includes cleaning the mirror frame to ensure the decorative pieces adhere properly.
Next, choose the design style. A seashell border works well for coastal themed rooms. Wooden sticks arranged in a circular pattern create a rustic sunburst effect. Mosaic tiles produce a modern and colorful appearance. Begin arranging the decorative pieces around the frame before gluing them down permanently. This step allows you to adjust spacing and alignment. Once satisfied, glue the pieces securely and allow them to dry. The finished mirror adds elegance and personality to your room. It can be placed above a bed, beside a closet, or in a hallway. This DIY project offers flexibility and creativity while improving room aesthetics.

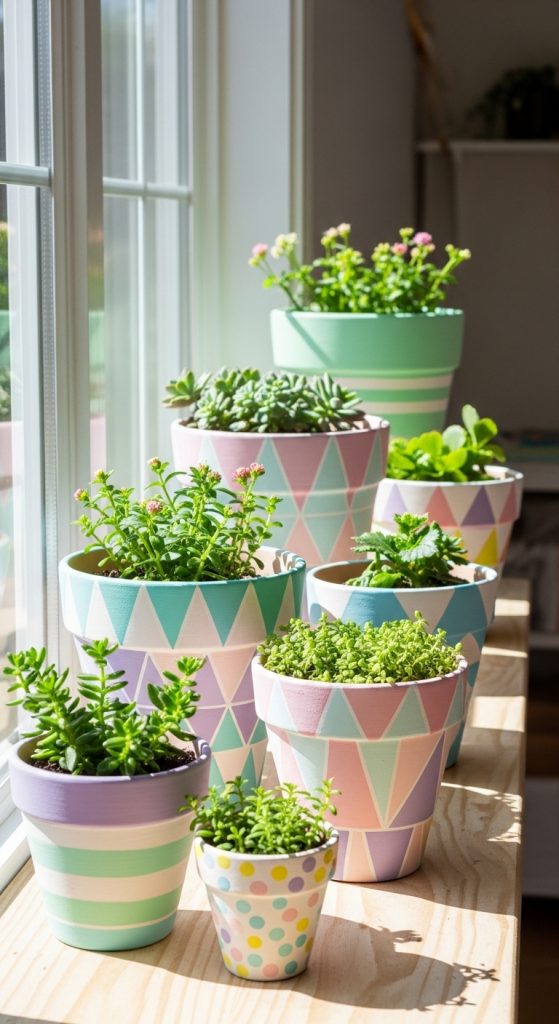
9. DIY Painted Flower Pots
Flower pots add natural beauty and greenery to indoor spaces. Painting your own pots allows you to match your decor theme and express creativity. You will need clay pots, acrylic paint, brushes, painter tape, and a sealing spray. Begin by cleaning the pots to remove dust and moisture. Preparation ensures the paint applies smoothly and lasts longer.
Use painter tape to create clean lines or patterns. You can paint solid colors, stripes, polka dots, or artistic designs. Experiment with tone combinations such as pastel palettes for a soft look or bold colors for a lively atmosphere. Allow the paint to dry completely before adding additional layers. Once finished, seal the pot with spray to protect it from water damage. You can place small indoor plants like succulents, herbs, or decorative artificial plants inside the pots. Painted flower pots brighten up desks, windowsills, bookshelves, and bedside tables. This DIY craft is simple yet effective, and it helps integrate nature into your decor while adding a personalized touch.
10. DIY Fabric Covered Storage Boxes
Fabric covered storage boxes are perfect for organizing your room while keeping it stylish. Instead of purchasing expensive decorative bins, you can convert old cardboard boxes into functional and beautiful storage containers. Materials include cardboard boxes, fabric, glue, scissors, and measuring tape. Begin by selecting the fabric pattern that complements your room. Preparation involves measuring the box dimensions to cut the fabric accurately.
Apply glue to the outer surface of the box and attach the fabric piece by piece. Smooth out wrinkles as you cover each side. Fold the fabric neatly at the edges to create a clean finish. You can line the inside of the box with a contrasting fabric for extra flair. Once complete, add labels or ribbon handles if desired. These boxes are excellent for storing clothes, stationery, accessories, or craft supplies. They make a room look tidy while contributing to the overall decor. This DIY project is affordable and can be customized endlessly with different fabrics, textures, and colors.
