
10 Elegant Christmas Nails
Creating elegant Christmas nails is one of the best ways to elevate your holiday look. Whether you prefer timeless simplicity or detailed designs, a luxurious manicure ties your entire seasonal aesthetic together. Elegance in nail art is not just about glitter or bold colors. It is about intentional design, high quality materials, proper preparation, and thoughtful execution. This detailed guide explores ten sophisticated nail ideas for Christmas, each explained with preparation steps, materials needed, application instructions, and design insights. By the end, you will have a full understanding of how to recreate each look at home or in a salon.
Before diving into the designs, it is essential to remember that good nail art starts with proper preparation. Clean nails, shaped tips, and primed surfaces allow products to adhere better and make nail art last longer. Use a high quality base coat, a durable top coat, and slow, precise strokes when applying your polish. Elegance comes from detail and refinement, not rush and excess.

Below are the ten luxurious Christmas nail ideas explained in depth.
1. Classic Red With Gold Thin Lines
This design is ideal for those who love traditional Christmas colors but want a minimalistic elevated approach. To start, prepare the nails by soaking them in warm water to soften the cuticles. After drying them thoroughly, push back cuticles gently and shape the nails in oval or almond form for a more graceful appearance. Buff the surface lightly to remove shine and apply a strong base coat to prevent staining from red polish. The materials required include a deep red nail polish, a gold nail striping polish, and a glossy top coat. Begin by applying two even coats of red polish, letting each coat dry properly to avoid streaking. Using a striping brush dipped in gold polish, draw fine vertical or diagonal lines on each nail. The key is minimalism, so keep the lines thin and consistent. This creates a sophisticated contrast without overpowering the nail. Finish with a glossy top coat to seal in the design and add a high shine effect. The final result is elegant, timeless, and appropriate for both holiday gatherings and everyday wear throughout the season.

2. Snowy White Almond Nails With Pearl Accents
This nail design embodies winter elegance with a soft snowy appearance. Begin by prepping your nails as usual, ensuring they are clean, shaped, and free from oils. Almond shaped nails complement the softness of the aesthetic, giving a refined look. Materials you will need include a matte white polish, pearl embellishments in various sizes, nail glue, tweezers, and a clear top coat. First apply a base coat, then two coats of matte white polish for a smooth frosted effect. Allow each layer to dry fully before adding the next. Once the polish is dry, use tweezers to place small pearl accents near the base or center of the nail. Make sure to apply a tiny dot of nail glue beforehand to secure each pearl firmly. This design aims to mimic a delicate snowy landscape, so avoid overcrowding the pearls. The beauty lies in simplicity. Finish the look with a thin layer of clear top coat around the pearls to prevent lifting while preserving the matte effect on the rest of the nail. The final result is soft, luxurious, and reminiscent of winter frost.

3. Elegant Burgundy Nails With Subtle Gold Foil
Burgundy is an ideal shade for creating a luxurious Christmas look without appearing overly festive. To create this style, begin with thorough nail preparation. Remove old polish, shape the nails in a square or rounded square shape, and buff lightly to create a smooth surface. The materials needed include burgundy gel polish, gold foil sheets, a foil adhesive, tweezers, and a high shine gel top coat. Apply a base coat followed by two layers of burgundy polish, curing each layer under a lamp if using gel. Once dry, apply a small amount of foil adhesive to random areas of the nails. After the adhesive becomes tacky, press pieces of gold foil using tweezers. The key is to keep the foil placement minimal so it appears elegant rather than flashy. Seal the design with a shiny gel top coat, which enhances the richness of the burgundy and secures the foil in place. This combination creates a warm romantic holiday feel suitable for formal gatherings or winter evenings.

4. French Tips With Silver Glitter Fade
A modern holiday twist on the traditional French manicure, this design blends subtle sparkle with clean lines. Begin by shaping the nails into a classic square or almond shape and prep them thoroughly. You will need nude polish, clear polish, silver glitter powder or glitter polish, a fan brush, and a high quality top coat. Start by applying a thin coat of nude or soft pink polish to create a natural base. Once it dries, create crisp white French tips using white polish or gel. Allow the tips to dry completely before moving to the glitter fade. Using a small fan brush, gently dab silver glitter onto the tips, gradually fading it downward. The goal is a soft gradient rather than full coverage. If using glitter polish, apply it lightly for the same effect. Finish with a glossy top coat to smooth the surface and enhance the design. This style embodies class and sophistication while still offering a festive sparkle that is perfect for holiday parties.

5. Matte Forest Green Nails With Gold Studs
Forest green is a rich and elegant shade that fits beautifully into the Christmas season. This design uses matte polish combined with subtle studs for an elevated effect. Begin by trimming and shaping the nails into a medium almond or coffin shape for a more dramatic look. The materials needed include matte forest green polish, tiny gold studs, nail glue, tweezers, and a matte top coat. Apply a smooth base coat, followed by two coats of forest green polish. Ensure each layer dries evenly. Once the polish is dry, apply small gold studs at the base of each nail or create a minimal pattern depending on your preference. Use tweezers for accurate placement and secure them with a dot of nail glue. Avoid heavy decoration to keep the design classy. Seal the nails with a matte top coat to maintain the velvety finish. The combination of deep green and gold results in a regal Christmas manicure that pairs well with evening wear or festive dinners.

6. Soft Nude Nails With White Snowflake Art
This look is ideal for those who love minimalistic elegance with delicate seasonal details. Prepare the nails by shaping them into a natural oval form and buffing the surface to create a smooth canvas. You will need nude polish, white stamping polish or a fine detail brush, snowflake stencil stamps, dotting tools, and a glossy top coat. Apply a base coat followed by two coats of nude polish, letting each coat dry thoroughly. Once dry, use a stamping plate or freehand method to draw white snowflakes on selected nails. Choose different sizes to create visual interest. Use a dotting tool to add small dots around the snowflakes to resemble soft falling snow. Keep the artwork minimal to maintain the refined look. After completing the design, apply a top coat to seal the artwork and give the nails a polished finish. The result is subtle, feminine, and ideal for everyday elegance throughout the holiday season.

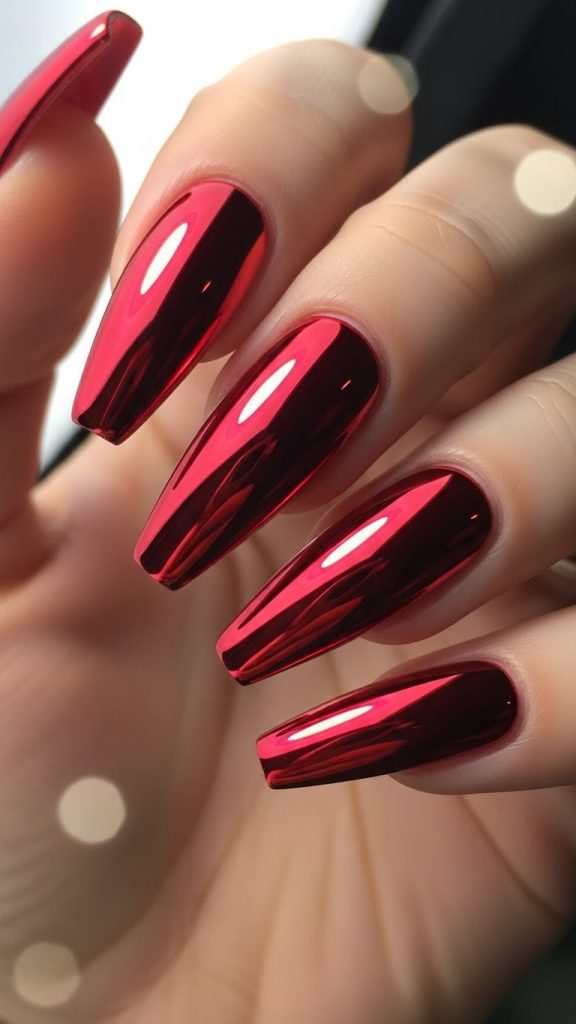
7. Ruby Red Chrome Nails
Chrome nails are a sophisticated option for those who want a bold yet elegant Christmas look. Begin by filing and shaping the nails into a smooth coffin or almond shape. Buff the surface lightly to help the base adhere. Materials required include red gel polish, chrome mirror powder in a ruby tone, a no wipe top coat, a sponge applicator, and a high shine finishing top coat. Start by applying two coats of red gel polish, curing each coat. Apply a no wipe top coat and cure again. Once the surface is ready, use the sponge applicator to rub the chrome powder onto the nails. Continue until a smooth mirror like effect is achieved. The rich red chrome creates a luxurious gemstone appearance perfect for special events. Finish with a high shine top coat to protect the chrome and enhance its reflective quality. The final look is dramatic, elegant, and reminiscent of festive ornaments, making it a favorite for holiday celebrations.
8. Champagne Gold Glitter Nails
This design focuses on elegance through a monochromatic shimmering finish. Preparation begins with shaping the nails into a rounded or almond style to maintain softness. Fully clean the nail plate, remove any oils, and apply a base coat. The materials needed include champagne gold glitter polish, loose fine glitter, a sponge for application, and a top coat. Apply one thin coat of nude or beige polish as a base to even out the surface. Once dry, apply a coat of champagne glitter polish. For a more intense sparkle, dab loose glitter onto the wet polish using a sponge. This method ensures even distribution and a smooth finish. Avoid adding too many layers to prevent thickening. Finish with a strong clear top coat to seal the glitter and prevent rough texture. The champagne tone provides a refined glow rather than an overpowering shine, making it perfect for elegant Christmas gatherings or winter weddings.

9. Navy Blue With Silver Stars
This design combines a deep winter night sky color with delicate starlike accents. Begin by shaping your nails into a square or almond form and preparing the nail surface thoroughly. You will need navy blue polish, silver star stickers or stamping tools, tweezers, and a glossy top coat. Apply a base coat, then two coats of navy polish for a rich opaque base. Once dry, place small silver star accents randomly on a few nails. Do not overcrowd the design. The goal is to create a sophisticated starry night effect. Gently press the stars with tweezers for secure placement. For added elegance, add tiny silver dots using a dotting tool to resemble distant stars. Seal everything with a glossy top coat to blend the stars into the design and enhance the deep blue background. This look is refined and visually striking without being overly bold.

10. Soft Pink Nails With Gold Leaf Accents
Soft pink is a timeless shade that blends beautifully with delicate gold accents for a stylish Christmas manicure. Start by shaping and prepping the nails thoroughly. Materials needed include pastel pink polish, gold leaf sheets, a nail adhesive, a detail brush, and a glossy top coat. Apply a base coat followed by two coats of pastel pink polish. Allow them to dry fully. Using a small detail brush, apply nail adhesive where you want the gold leaf to sit. Gently press the gold leaf using tweezers, then remove the excess with a soft brush. The irregular texture of the leaf creates a luxurious effect without overpowering the soft pink background. Finish with a glossy top coat to protect the leaf and create a smooth even surface. This design offers a romantic and highly elegant aesthetic perfect for those who prefer soft feminine holiday looks.
