
10 Scrapbook Design Picture ideas
Scrapbooking is a beautiful and meaningful way to preserve memories. In today’s digital world, where most photos stay inside mobile phones and laptops, creating a physical scrapbook brings a special emotional connection. A scrapbook is not just a collection of pictures. It is a personal storybook filled with colors, textures, handwritten notes, and creative designs. Each page reflects emotions, moments, and creativity. Whether you are saving memories from a birthday, wedding, vacation, baby milestones, or everyday life, scrapbook design helps you turn simple photographs into lasting treasures.

Before starting a scrapbook, proper preparation is important. You need a sturdy scrapbook album, quality paper, adhesive glue, double sided tape, scissors, craft knife, ruler, decorative paper, stickers, markers, and embellishments like ribbons, buttons, dried flowers, and washi tape. Choosing a theme for your scrapbook helps you stay organized. You should also print your photos in suitable sizes and arrange them before pasting. Planning the layout saves time and ensures a neat result. In this article, you will explore 10 scrapbook design picture ideas that are creative, simple, and easy to follow. Each idea includes materials and helpful tips to guide you.
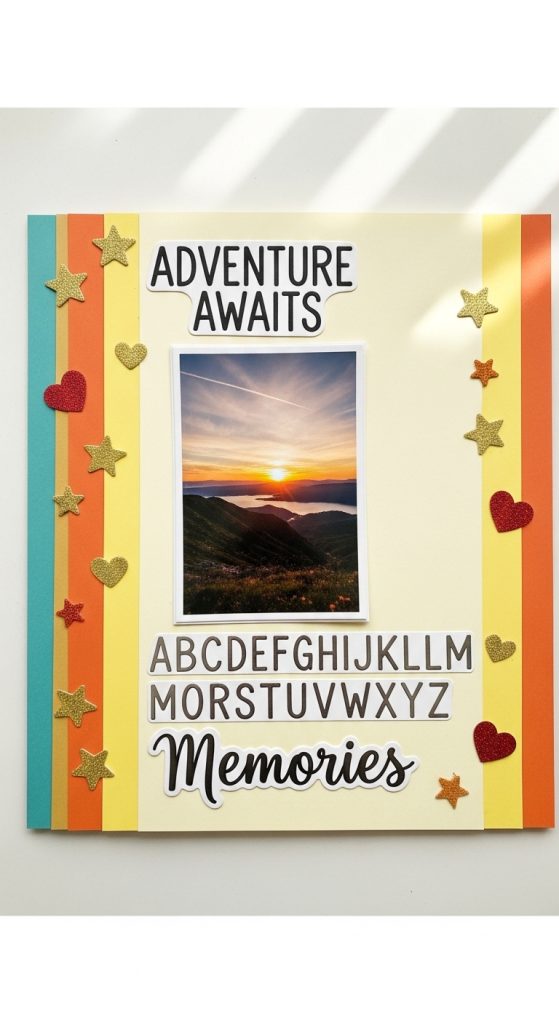
- Bold Title Page Memory Layout
A bold title page is the perfect way to begin your scrapbook. This design focuses on one large main picture placed at the center of the page. Around the photo, you can add a big handwritten or printed title that represents the theme, such as Birthday Celebration, Summer Vacation, or Family Moments. Use thick decorative paper as the background to make the page stand out.
Preparation for this design includes selecting a high quality main photo and choosing contrasting background paper. You can use colored cardstock, patterned paper, alphabet stickers, and decorative frames. Place the photo slightly raised using foam tape to create depth. Add small decorative items such as stars, hearts, or tiny cutouts around the edges.
Keep the layout balanced. Do not overcrowd the page. Leave some white space to make the design clean and attractive. Use markers to write the date and a short description below the picture. This simple but bold layout works well for the first page of any scrapbook and sets the tone for the rest of the album.
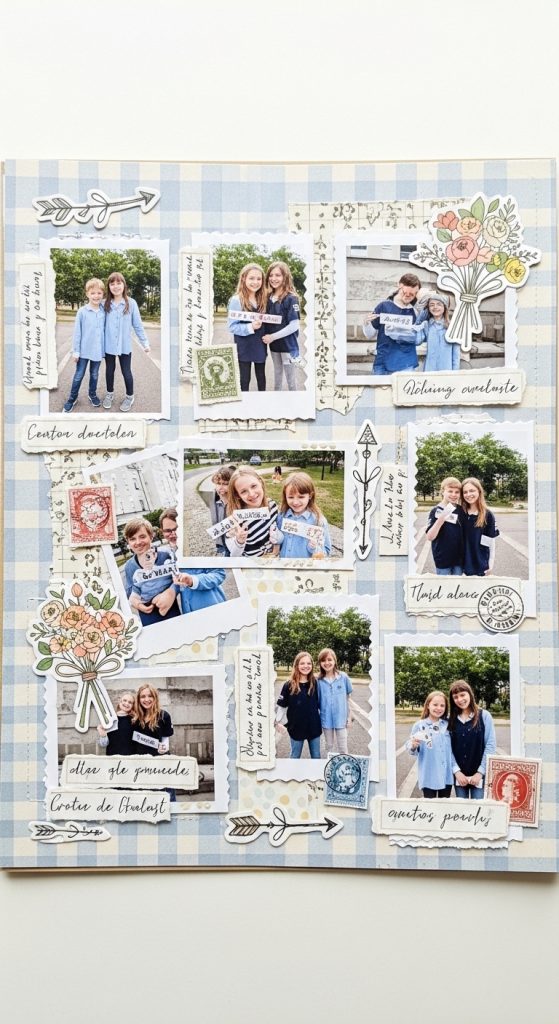
- Collage Style Picture Spread
A collage style layout allows you to use multiple photos on one page. This design is perfect for events where many pictures were taken, such as weddings, trips, or parties. Instead of placing photos in straight lines, you can overlap them slightly for a dynamic look.
Start by selecting 5 to 8 photos in different sizes. Trim them carefully and arrange them on the page before gluing. Use decorative scissors to create zigzag or wavy edges for some photos. The background paper should be simple so that the pictures remain the main focus.
Materials needed include glue stick, double sided tape, decorative paper, photo corners, stickers, and small captions printed on paper strips. You can write short notes like Fun Day or Best Moments near each photo.
This design gives energy to your scrapbook. Make sure the photos are arranged in a balanced way. Avoid covering important parts of the pictures when overlapping. A collage spread makes your page lively and filled with memories without looking too crowded.
- Minimalist White Space Design
A minimalist scrapbook design focuses on simplicity and elegance. In this layout, less decoration is used, and more empty space is left around the picture. This style works well for emotional or meaningful photos such as wedding portraits or baby pictures.
Choose a plain white or soft pastel background. Place one or two photos neatly aligned either in the center or slightly to one side. Use thin borders made from colored paper to frame the images.
Materials for this design include white cardstock, simple photo frames, black pen for journaling, and light adhesive. Write a short paragraph beside the picture describing the memory or feeling connected to it.
The key to this style is balance. Do not add too many stickers or decorations. Keep lines straight and clean. A minimalist design makes your scrapbook look professional and calm. It highlights the beauty of the photo rather than the decoration.

- Travel Map Themed Layout
A travel themed scrapbook page is perfect for vacation memories. This design includes maps, tickets, and small travel related items. Start by using a printed map or world map paper as the background.
Select photos from your trip and arrange them in a timeline order. Add small paper cutouts shaped like airplanes, cameras, or luggage. You can draw lines from the map location to the photo.
Preparation materials include printed maps, travel stickers, glue, scissors, double sided tape, and envelopes to store small tickets or receipts. You can also attach small pockets to keep boarding passes.
Write the destination name and date clearly at the top. Add short descriptions of your experiences. This design makes your scrapbook interactive and exciting. It tells the story of your journey visually and creatively.

- Vintage Memory Style Page
A vintage scrapbook design gives an old fashioned and classic look. Use brown, beige, or sepia toned background papers. Print photos in black and white for a more authentic feel.
Materials required include old style paper, lace ribbons, dried flowers, twine, and ink pads to create aged edges. You can lightly rub brown ink on paper corners to make them look antique.
Arrange photos neatly and add handwritten notes using a calligraphy pen. Use vintage stamps or old newspaper cuttings as decoration.
This design works beautifully for family history, grandparents’ memories, or old childhood photos. The soft colors and aged look create warmth and nostalgia. Keep the layout soft and avoid bright modern stickers to maintain the vintage theme.

- Seasonal Theme Scrapbook Page
A seasonal scrapbook page reflects a specific season such as summer, winter, spring, or autumn. Choose background paper that matches the season’s colors. For example, use orange and brown for autumn, bright yellow for summer, or light blue for winter.
Select photos related to seasonal activities like picnics, snowfall, or blooming flowers. Add decorations like paper leaves, snowflakes, or sun shapes.
Preparation materials include colored cardstock, seasonal stickers, glue, markers, and craft punches to cut themed shapes. You can also use textured paper for added interest.
Write the season name in bold at the top. Add short notes about what made that season special. This design adds variety to your scrapbook and makes each section unique and visually interesting.

- Grid Pattern Photo Layout
A grid pattern layout is neat and organized. In this design, photos are arranged evenly in rows and columns. This works well for photo series such as monthly baby pictures or school events.
Measure your page carefully using a ruler. Divide the space equally before placing photos. Keep all photos the same size for symmetry.
Materials required include ruler, pencil for light markings, glue, plain background paper, and simple labels. Avoid heavy decoration because the grid itself is the main design feature.
You can add small captions under each photo. This design gives a clean and professional look. It is ideal for people who prefer structured layouts over random placements.

- Pocket Style Interactive Page
A pocket style scrapbook page includes small envelopes or pockets attached to the page. These pockets can hold extra photos, letters, or small notes.
To create this design, cut small paper envelopes and glue them on the page. Insert photos or folded notes inside. Decorate the pockets with small labels.
Materials include thick paper, glue, scissors, decorative tape, and mini tags. You can also tie a small ribbon to close the pocket.
This interactive design adds surprise and creativity. It allows you to include more memories without crowding the page. It also makes the scrapbook fun to explore.

- Timeline Storytelling Layout
A timeline scrapbook design shows events in order. Draw a horizontal or vertical line across the page. Place photos along this line according to dates.
Use small labels to mark years or important milestones. This layout works well for growth journeys, relationships, or project progress.
Materials include ruler, fine tip pen, printed date labels, glue, and simple background paper. Keep decoration minimal so the timeline remains clear.
Add short descriptions under each picture explaining what happened. This design turns your scrapbook into a storybook, helping viewers understand the sequence of events clearly.

- Mixed Media Artistic Page
A mixed media scrapbook page combines paint, paper, fabric, and photos. This design is creative and expressive. Start by painting the background lightly using watercolor or acrylic paint.
After the paint dries, add photos and decorate with fabric pieces, lace, buttons, or textured paper. Use layering techniques to create depth.
Materials required include paint, brushes, glue, craft knife, textured paper, and embellishments. Be careful not to use too much paint near the photo area.
This artistic style allows freedom and creativity. It works well for emotional memories or artistic projects. Each page looks unique and personal.
