10 Craft ideas with paper flowers ideas
Paper flowers are one of the most versatile and affordable craft projects you can make. They are beautiful, customizable, and suitable for all ages. Whether you are decorating your home, planning a party, preparing handmade gifts, or simply looking for a relaxing hobby, paper flowers offer endless creative possibilities. Unlike real flowers, paper flowers do not wilt or fade. You can choose any color, size, or style you like, and you can match them perfectly with your theme or space.
Another great advantage of paper flower crafts is that the materials are easy to find. Most projects require basic supplies such as colored paper, scissors, glue, and sometimes wire or tape. Many of these items may already be in your home. You can also recycle old magazines, newspapers, or gift wrap to create eco-friendly designs.
In this blog post, you will discover 10 clearly explained craft ideas using paper flowers. Each idea includes preparation steps, materials needed, and useful tips to help you achieve the best results. The instructions are written in simple language so beginners can easily follow along. Let’s explore these creative and enjoyable paper flower projects.
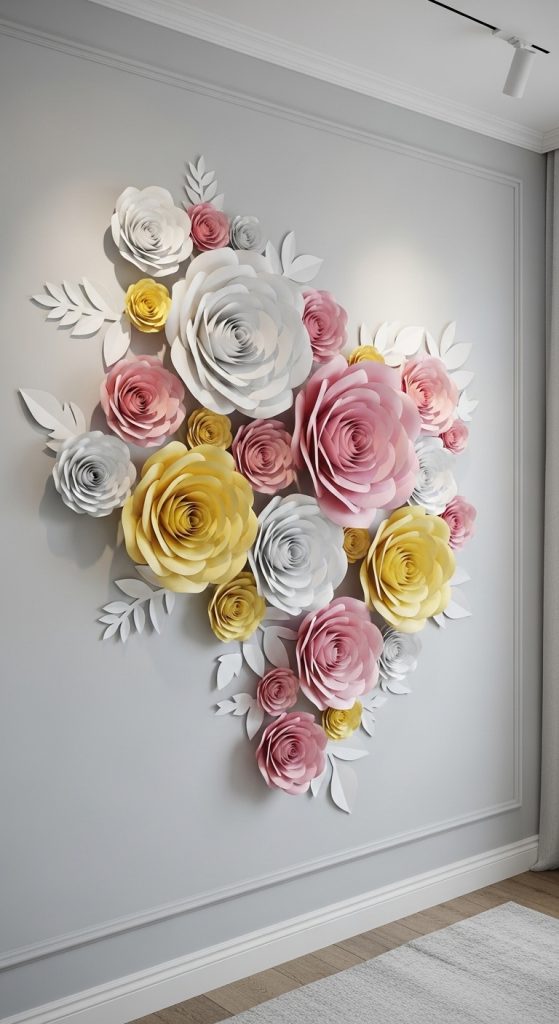
1. Paper Flower Wall Art
Paper flower wall art is a beautiful way to decorate any room. It works well in bedrooms, living rooms, nurseries, or even offices. You can create a single large flower as a focal point or design a full floral arrangement directly on the wall.
Materials needed:
Colored cardstock or craft paper, scissors, glue gun or strong craft glue, pencil, ruler, and optional wall-safe adhesive strips.
Preparation:
First, choose your color theme. Soft pastels create a calm atmosphere, while bright colors make a bold statement. Draw petal shapes on the paper. Cut multiple petals in different sizes. Larger petals will form the outer layer, and smaller petals will go inside.
To assemble, start by gluing the largest petals in a circle. Gradually add smaller petals on top, layering them inward. Finally, create a center using rolled paper or a small circular cutout.
Usage:
Attach the finished flower to the wall using removable adhesive strips. You can arrange multiple flowers in different sizes for a dramatic floral wall display.
Helpful tip:
Curl the edges of the petals slightly using a pencil to make them look more natural and three-dimensional.
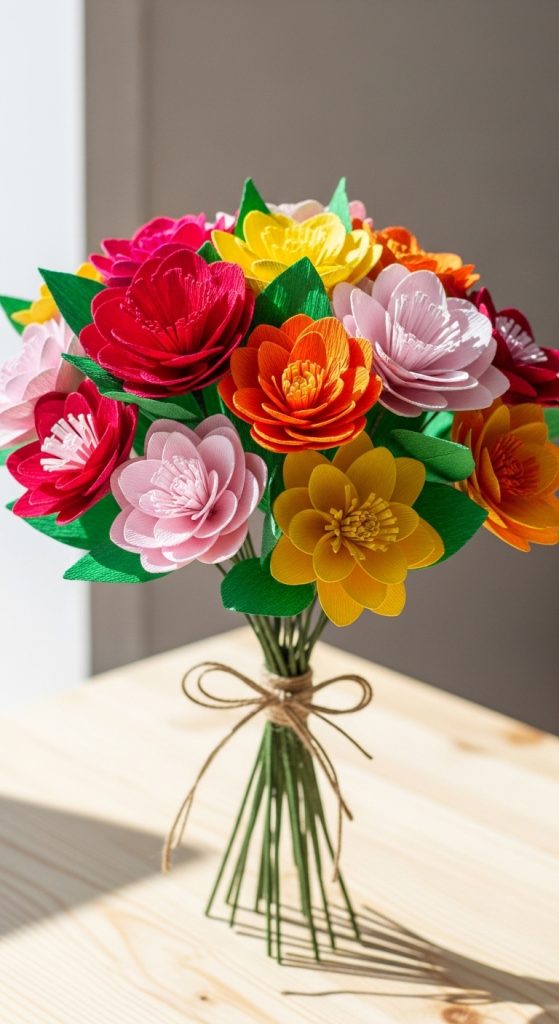
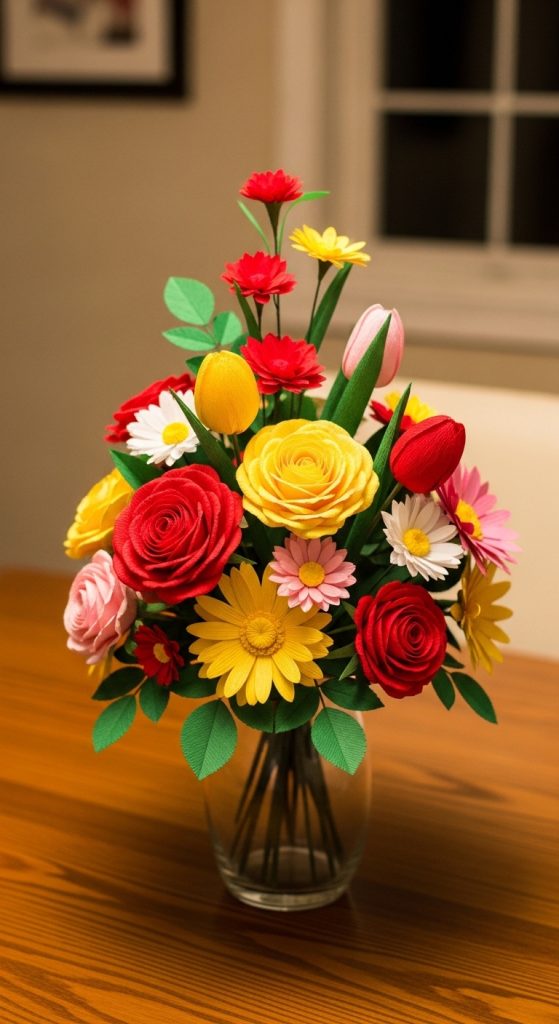
2. Paper Flower Bouquet
A paper flower bouquet makes a wonderful gift for birthdays, anniversaries, or special celebrations. It is long-lasting and can be customized to suit the recipient’s favorite colors.
Materials needed:
Colored paper, floral wire or wooden skewers, floral tape, scissors, glue, and ribbon.
Preparation:
Choose several flower designs such as roses, daisies, or tulips. Cut petal shapes and assemble each flower head. Attach the flower head to floral wire or a wooden skewer using glue. Wrap floral tape around the base to secure it and create a neat stem.
Make several flowers in different colors and sizes. Add paper leaves by cutting leaf shapes from green paper and attaching them to the stems.
Usage:
Once all flowers are complete, arrange them like a real bouquet. Tie the stems together with ribbon. You can wrap the bouquet in tissue paper for a professional look.
Helpful tip:
Mix light and dark shades of the same color to add depth and realism to your bouquet.
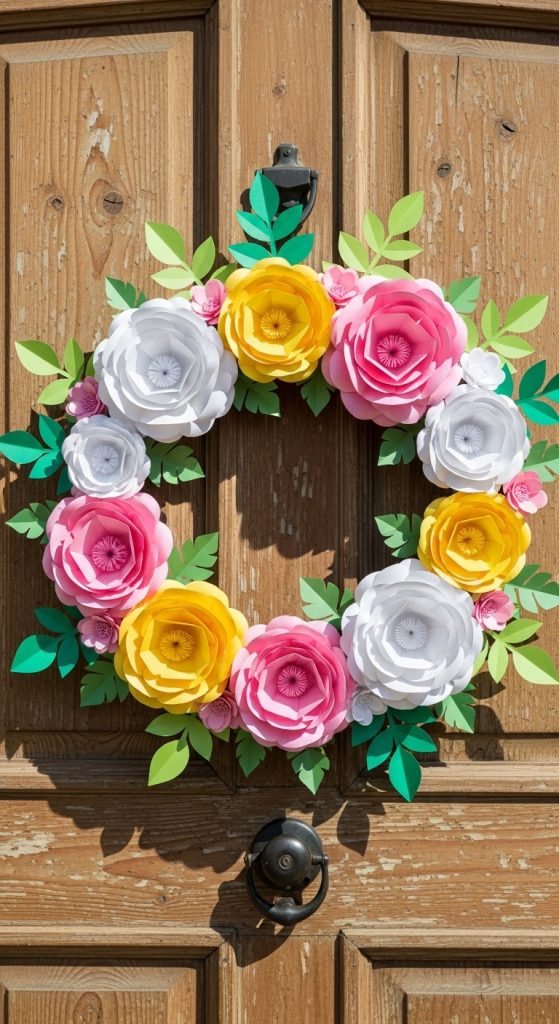
3. Paper Flower Wreath
A paper flower wreath is perfect for decorating your front door or indoor walls. It is especially popular for seasonal decorations.
Materials needed:
Cardboard or foam wreath base, colored paper, scissors, glue gun, ribbon, and optional artificial leaves.
Preparation:
Cut a circular ring from cardboard if you do not have a ready-made wreath base. Prepare several paper flowers in various sizes and styles. Make enough flowers to fully cover the wreath base.
Start gluing the larger flowers first. Fill in empty spaces with smaller flowers and leaves. Overlapping slightly will give a fuller appearance.
Usage:
Attach a ribbon loop to the back for hanging. You can customize your wreath for different seasons by changing colors. For example, use red and pink for spring or warm tones like orange and yellow for autumn.
Helpful tip:
Plan your color placement before gluing to ensure a balanced and harmonious design.
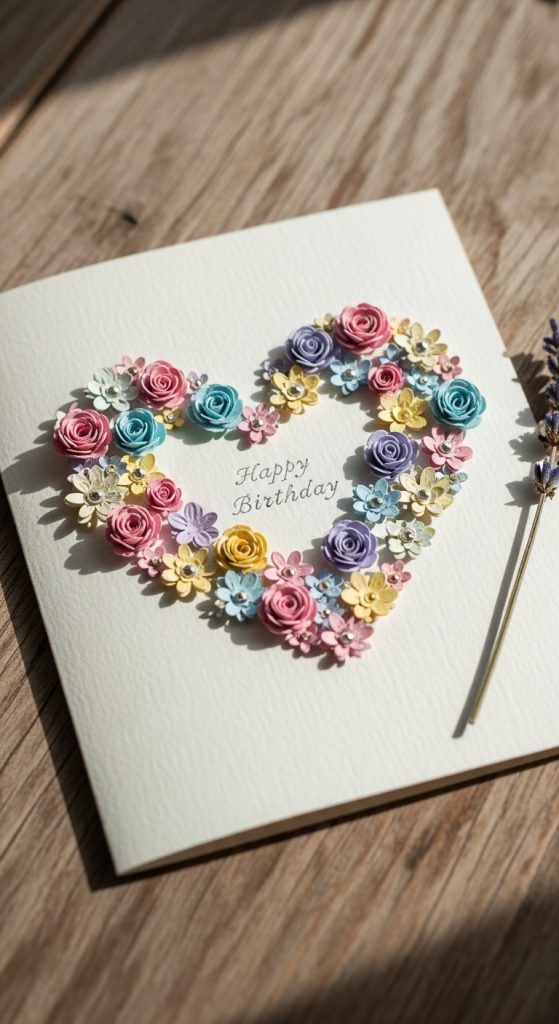
4. Paper Flower Greeting Cards
Handmade greeting cards decorated with paper flowers add a personal and thoughtful touch to any message.
Materials needed:
Blank cardstock, colored paper, scissors, glue, markers, and optional decorative paper.
Preparation:
Fold a piece of cardstock to create your card base. Create small paper flowers by cutting simple petal shapes or using a paper punch. Assemble tiny layered flowers for a delicate look.
Glue the flowers onto the front of the card. Arrange them in a corner, along one edge, or in the shape of a heart. Add a handwritten message or decorative lettering.
Usage:
These cards are perfect for birthdays, weddings, thank-you notes, or Mother’s Day. Because they are handmade, they feel more meaningful.
Helpful tip:
Use foam adhesive dots instead of regular glue to give the flowers a raised, three-dimensional effect.
5. Paper Flower Centerpieces
Paper flower centerpieces are ideal for weddings, parties, and family gatherings. They can be customized to match the event theme.
Materials needed:
Colored paper, vase or decorative container, floral foam, wooden sticks or wire, scissors, glue, and tissue paper.
Preparation:
Create several paper flowers in coordinating colors. Attach each flower to a stick or wire stem. Place floral foam inside the vase to hold the stems upright.
Insert the stems into the foam and arrange them evenly. Add tissue paper or decorative stones to cover the foam.
Usage:
Place the finished centerpiece on dining tables, gift tables, or reception desks. These centerpieces can be prepared well in advance since they will not wilt.
Helpful tip:
Vary the height of the flowers to create a more natural and visually interesting arrangement.
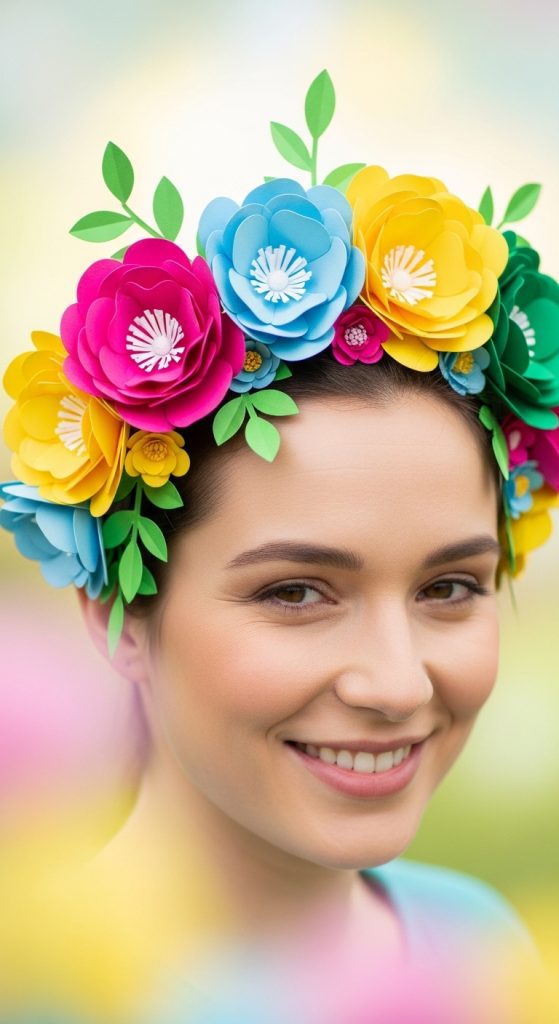
6. Paper Flower Headbands
Paper flower headbands are popular for parties, photoshoots, and festivals. They are lightweight and fun to wear.
Materials needed:
Paper flowers, plain headband, glue gun, felt pieces, scissors.
Preparation:
First, create small to medium-sized paper flowers. Cut small felt circles to place behind each flower for extra support.
Apply glue to the felt and attach the flower. Then glue the flower securely onto the headband. Arrange flowers along one side for a stylish look or cover the entire band for a crown effect.
Usage:
These headbands are perfect for children’s parties, costume events, or themed celebrations.
Helpful tip:
Keep the flowers lightweight to ensure the headband remains comfortable to wear.
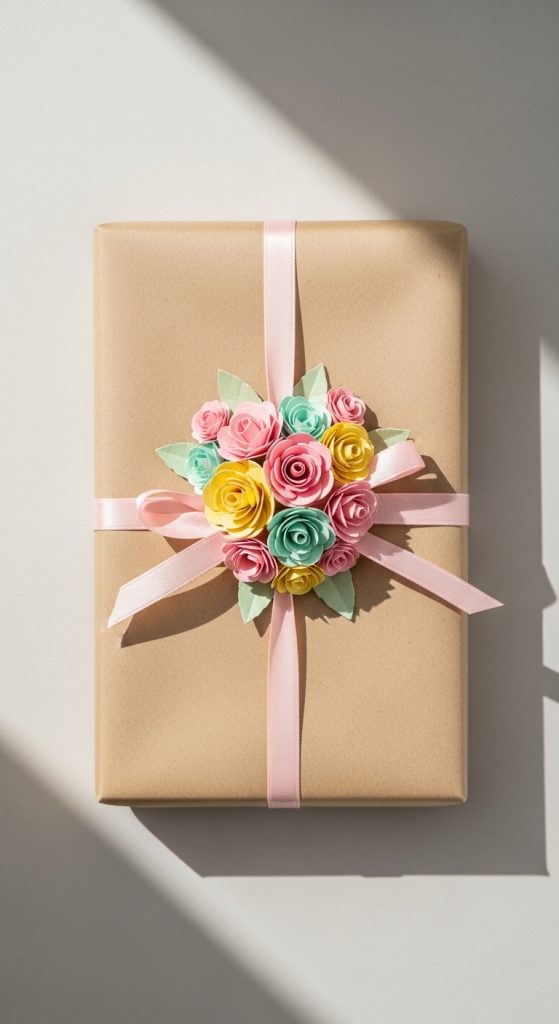
7. Paper Flower Gift Wrapping Decorations
Adding paper flowers to gift wrapping makes any present look elegant and unique.
Materials needed:
Wrapping paper, ribbon, small paper flowers, glue, and scissors.
Preparation:
Wrap your gift normally. Create small paper flowers using leftover paper or matching colors. You can make simple five-petal flowers for quick decoration.
Glue one or two flowers on top of the gift near the ribbon. Add leaves or small paper accents for extra detail.
Usage:
This idea works well for birthdays, weddings, or holiday gifts. It adds a handmade touch without requiring expensive decorations.
Helpful tip:
Use double-sided tape instead of glue to avoid visible glue marks on the wrapping paper.
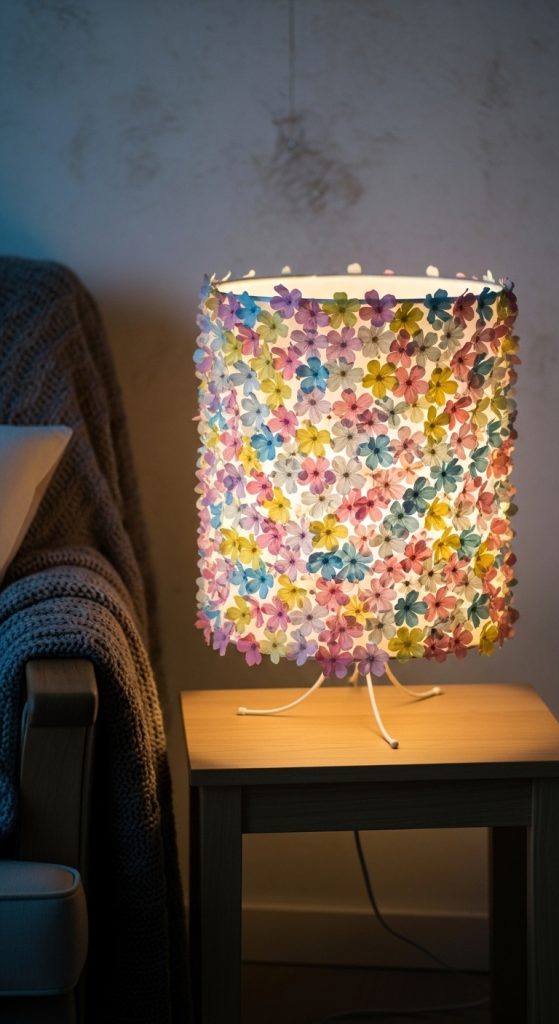
8. Paper Flower Lampshade Decoration
Decorating a lampshade with paper flowers creates a soft and romantic atmosphere in any room.
Materials needed:
Plain lampshade, lightweight paper flowers, glue, scissors.
Preparation:
Make small and lightweight paper flowers. Avoid thick cardstock because it may be too heavy. Arrange the flowers on the lampshade before gluing to decide placement.
Glue the flowers carefully onto the outside surface. Make sure not to place them too close to the bulb.
Usage:
This decoration works best with LED bulbs that produce minimal heat. It adds charm to bedrooms or reading corners.
Helpful tip:
Choose light-colored paper to allow some light to pass through and create a soft glow.
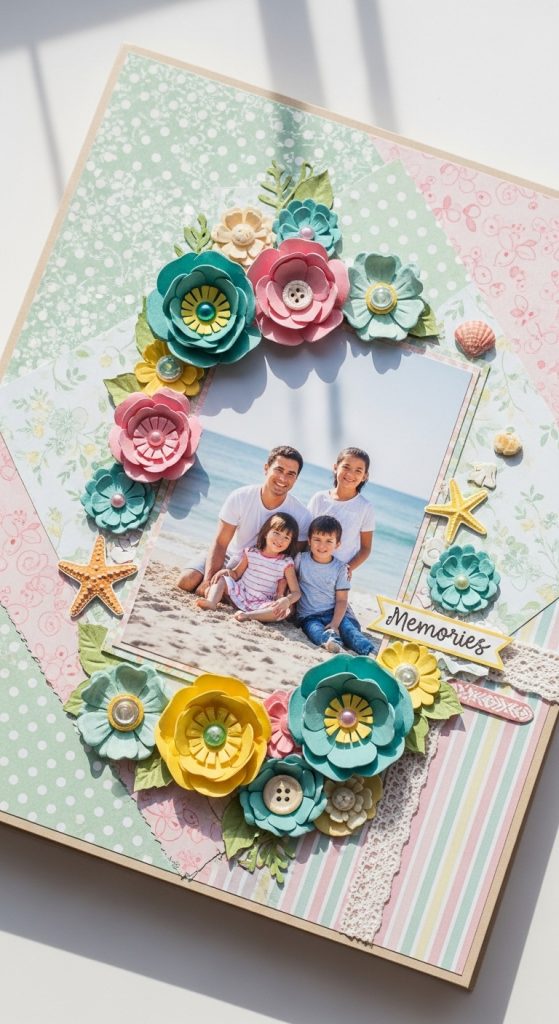
9. Paper Flower Scrapbook Embellishments
Paper flowers can enhance scrapbook pages and memory albums.
Materials needed:
Scrapbook album, colored paper, glue, photos, decorative paper, scissors.
Preparation:
Create small flat paper flowers to avoid adding too much bulk to your album. Layer different paper patterns for interesting designs.
Glue the flowers around photos or along page borders. Combine them with handwritten captions or decorative stickers.
Usage:
This craft is perfect for preserving memories from vacations, weddings, or birthdays.
Helpful tip:
Keep the flower sizes small so the pages can close properly without damage.
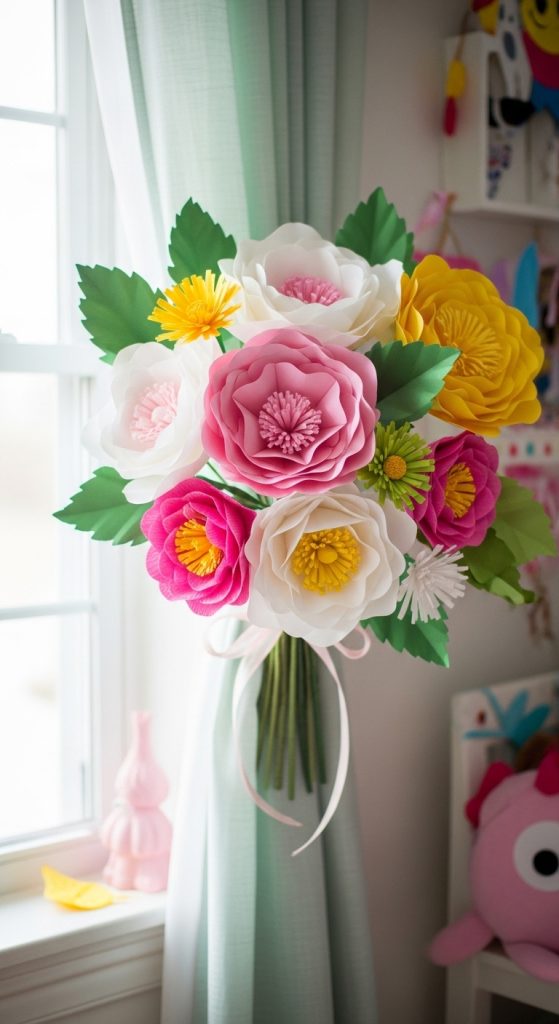
10. Paper Flower Curtain Tiebacks
Paper flower curtain tiebacks add a creative and cheerful touch to home décor.
Materials needed:
Large paper flowers, ribbon or fabric strip, glue, scissors.
Preparation:
Create one or two large sturdy paper flowers. Attach each flower to a strong ribbon or fabric strip. Make sure the ribbon is long enough to wrap around the curtain.
Usage:
Wrap the ribbon around the curtain and tie it at the side to hold the curtain open. This works especially well in children’s rooms or creative spaces.
Helpful tip:
Use thicker paper for these flowers to make them more durable and long-lasting.