10 Easter Craft Decorations
Easter is a joyful season that celebrates renewal, hope, and fresh beginnings. As spring arrives with blooming flowers and brighter days, many families enjoy decorating their homes to reflect the cheerful spirit of this special time. Easter craft decorations are a wonderful way to add warmth and personality to your space. They also create meaningful opportunities to spend time with family and friends. Whether you enjoy simple paper crafts or more detailed handmade projects, there are many creative ideas that suit all ages and skill levels.
Making your own decorations allows you to choose colors, textures, and styles that match your home. You can reuse affordable materials, recycle old items, and even involve children in safe and fun crafting activities. From painted eggs and bunny garlands to floral wreaths and table centerpieces, Easter crafts can brighten every corner of your house. In this blog post, you will find ten detailed Easter craft decoration ideas. Each idea includes preparation steps, materials needed, and helpful tips to make your project successful. With simple language and clear guidance, these ideas will help you create beautiful handmade decorations that celebrate the true joy of Easter.
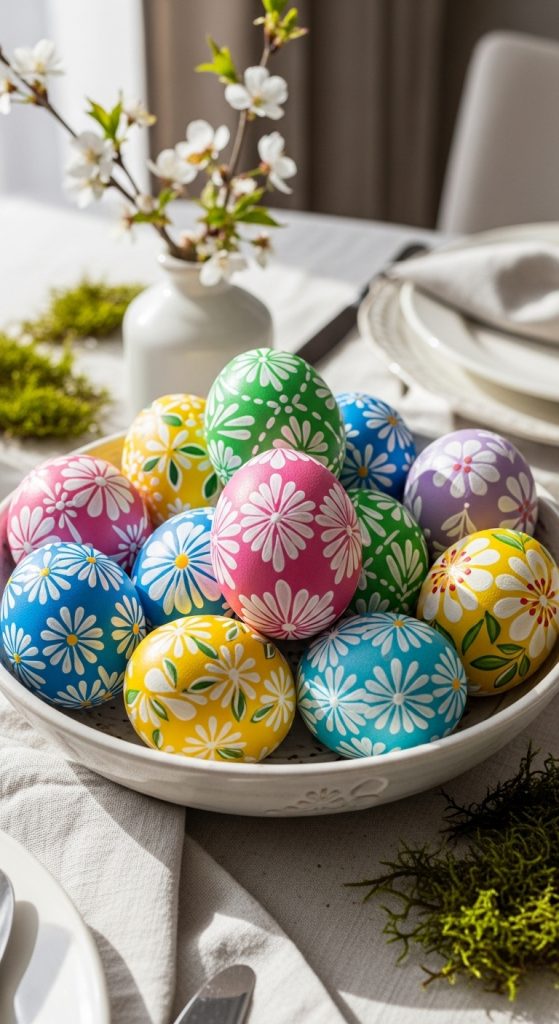
1. Painted Easter Egg Display
Painted Easter eggs are one of the most traditional and beautiful decorations for the season. They can be displayed in bowls, baskets, or arranged as a centerpiece on your dining table. To prepare, you will need real eggs or plastic craft eggs, acrylic paints, paintbrushes, a cup of water, paper towels, and a protective sheet for your workspace. If you are using real eggs, carefully blow out the contents by making small holes on both ends and rinsing the shells.
Start by applying a base coat of light color such as white, pastel pink, baby blue, or soft yellow. Let the eggs dry completely before adding designs. You can create patterns like stripes, polka dots, flowers, or simple geometric shapes. Use thin brushes for fine details and thicker brushes for larger areas. For children, sponge painting is an easy and fun technique. Once all designs are dry, apply a clear varnish or sealant to give the eggs a glossy finish and protect the paint.
Arrange your finished eggs in a decorative bowl lined with shredded paper or artificial grass. You can also place them in a clear glass jar for a modern look. This craft is simple yet elegant, and it brings bright color into your home. Painted Easter eggs are perfect for both beginners and experienced crafters.
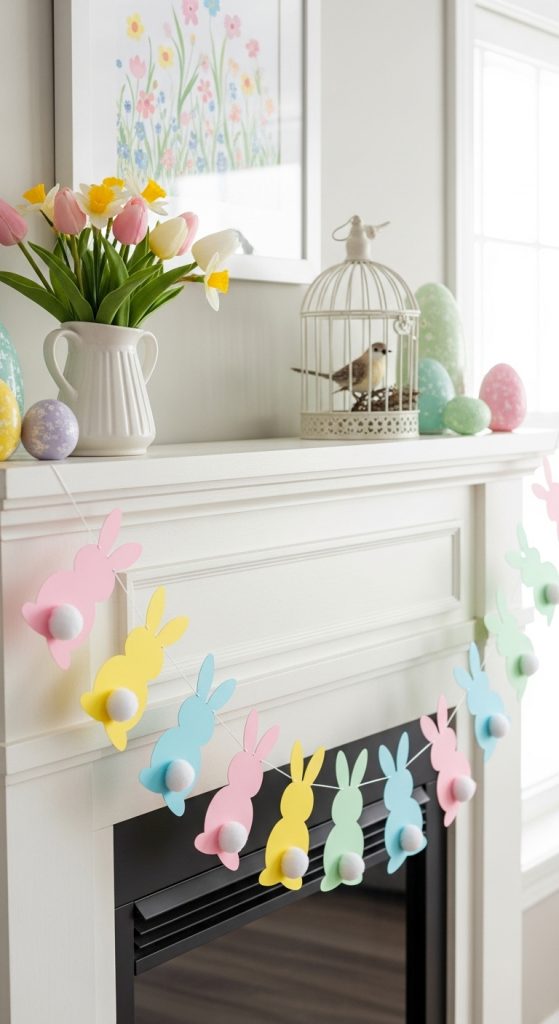
2. Bunny Paper Garland
A bunny paper garland is a charming decoration that can be hung across walls, windows, or mantels. It adds a playful touch to your Easter celebration. For this project, you will need colored cardstock paper, scissors, a pencil, string or twine, glue, and cotton balls for tails.
Begin by drawing a bunny shape on a piece of paper to create a template. Cut it out and trace the shape onto multiple sheets of cardstock. Choose pastel colors like light purple, soft green, peach, and pale blue for a spring theme. Cut out each bunny carefully. If you want more detail, draw simple eyes and whiskers using a black marker.
Glue a small cotton ball onto each bunny to create a fluffy tail. Allow the glue to dry fully before attaching the bunnies to the string. Lay the string flat on a table and space the bunnies evenly. Use glue or tape to secure them in place. Make sure the string is long enough to fit the area where you plan to hang it.
This craft is affordable and easy to make with children. It requires simple materials and little preparation time. Once finished, hang the garland along a staircase railing, above a fireplace, or across a doorway. The soft colors and cute bunny shapes create a welcoming Easter atmosphere in any room.
3. Floral Easter Wreath
A floral Easter wreath is a beautiful decoration for your front door. It welcomes guests and adds a festive touch to your home. To make this wreath, you will need a foam or grapevine wreath base, artificial flowers, hot glue gun, ribbon, and decorative items like small eggs or miniature bunnies.
Start by choosing flowers in spring colors such as pink, yellow, lavender, and white. Trim the stems so they are short enough to attach easily to the wreath base. Arrange the flowers around the wreath before gluing them to decide on the design. You can cover the entire wreath with flowers or create a half-floral style for a modern look.
Once you are satisfied with the arrangement, use a hot glue gun to secure each flower firmly. Add small decorative eggs or bunny figures between the flowers for extra detail. Finish the wreath by tying a ribbon into a bow and attaching it to the top or bottom.
Allow all glue to cool completely before hanging the wreath on your door. This craft may require adult supervision due to the hot glue gun. A floral Easter wreath creates a warm and inviting entrance and can be reused every year if stored properly.

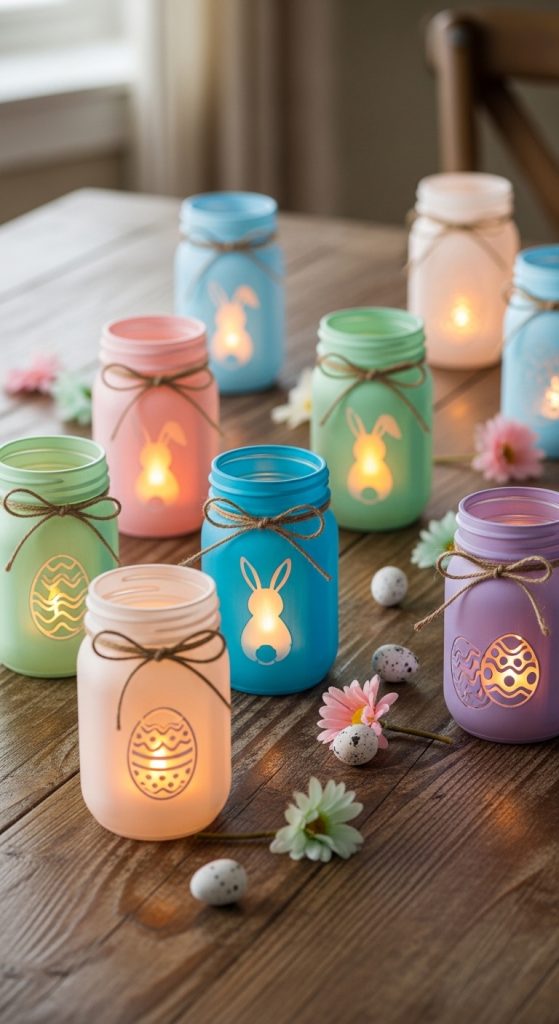
4. Easter Mason Jar Lanterns
Easter mason jar lanterns are a creative way to decorate tables, shelves, or outdoor spaces. They create a soft and cozy atmosphere. You will need clean mason jars, acrylic paint, paintbrushes, small LED tea lights, twine, and decorative stickers or stencils.
First, clean and dry the jars thoroughly. Paint the outside of each jar with pastel acrylic paint. You can apply one solid color or blend two colors for a soft effect. Let the first coat dry before adding a second coat if needed. To create Easter shapes, use stencils of bunnies, eggs, or flowers. Lightly paint over the stencil area with a contrasting color.
After the paint has dried, wrap twine around the top rim of the jar and tie it into a bow. This adds a rustic touch. Place an LED tea light inside the jar. Avoid using real candles, especially if children are present.
When lit, the jars create a gentle glow that highlights the painted designs. These lanterns are perfect for evening gatherings or Easter dinners. They are simple to make and can be customized in many ways. You can also give them as handmade gifts to friends and family.
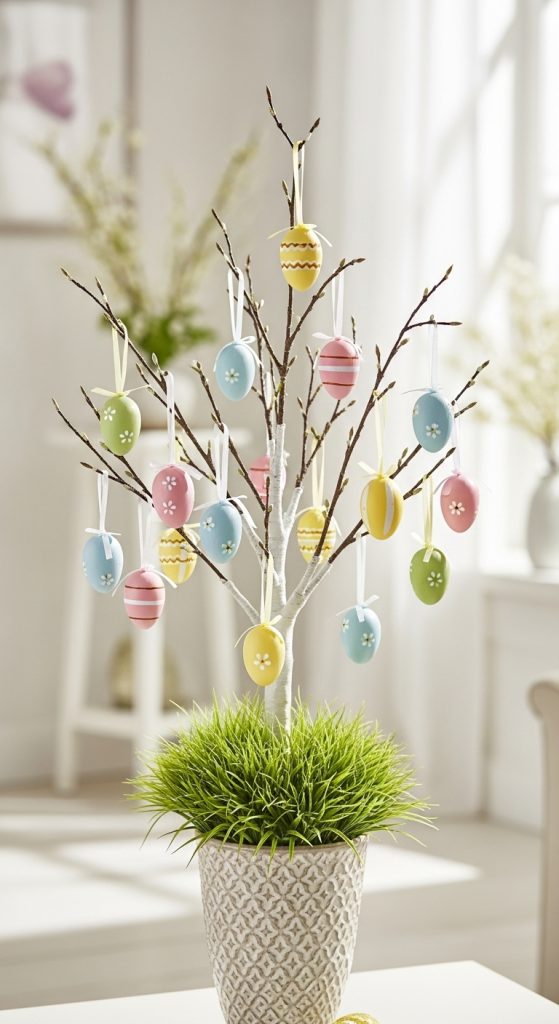
5. Decorative Easter Egg Tree
An Easter egg tree is a unique decoration that brings a fresh spring feeling into your home. To make this, you will need small branches, a vase, decorative plastic eggs, ribbon, and optional artificial grass.
Collect clean, dry branches from your garden or a local park. Make sure they are sturdy and have multiple smaller twigs. Place the branches in a vase and secure them with stones or sand at the bottom to keep them stable.
Decorate plastic eggs with paint, glitter, or stickers. Attach a small ribbon loop to each egg so it can hang easily. Once the eggs are ready, hang them carefully on the branches. Space them evenly to create balance.
You can place artificial grass or colorful paper at the base of the vase for extra decoration. This craft is simple but visually impressive. It works well as a centerpiece for a table or as a decoration in the living room.
An Easter egg tree symbolizes growth and new beginnings. It is lightweight, easy to assemble, and reusable. You can change the colors each year to match your seasonal theme.
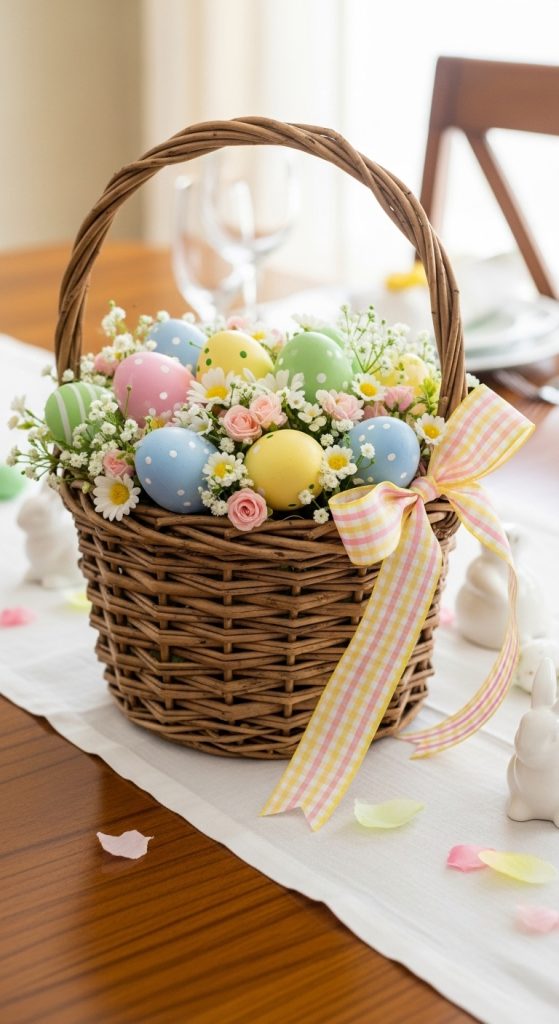
6. Handmade Easter Basket Centerpiece
A handmade Easter basket centerpiece adds charm to your dining table. For this project, you will need a medium-sized basket, artificial grass, decorative eggs, small flowers, and ribbon.
Begin by lining the basket with artificial grass. This creates a soft base and hides the bottom of the basket. Arrange decorative eggs in different colors and sizes inside. You can mix painted eggs with plain pastel ones for contrast.
Add small artificial flowers between the eggs to create a fresh look. Secure them with glue if necessary. Tie a ribbon around the handle of the basket and create a bow for a finishing touch.
This centerpiece is easy to prepare and does not require advanced crafting skills. It can be made in less than an hour and instantly brightens your dining area. After Easter, you can reuse the basket for storage or other seasonal decorations.
A handmade Easter basket centerpiece combines color, texture, and tradition. It is perfect for family gatherings and festive meals.
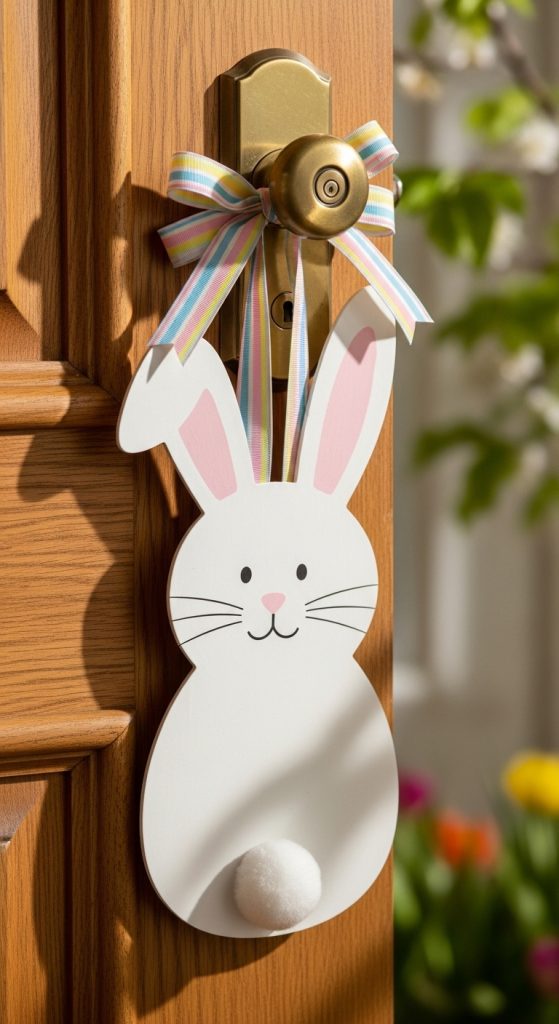
7. Easter Bunny Door Hanger
An Easter bunny door hanger is a fun decoration that can be placed on bedroom doors or the front entrance. You will need thick cardboard or foam board, paint, scissors, glue, ribbon, and markers.
Draw a large bunny shape on the cardboard and cut it out carefully. Paint the bunny in white or light gray and allow it to dry. Add details such as pink ears, a small nose, and whiskers using paint or markers.
You can attach a small fabric bow around the bunny’s neck for added charm. Glue a cotton ball on the back to create a fluffy tail. Punch two small holes at the top and thread a ribbon through them to create a hanger.
This craft is easy to customize. You can write a welcome message on the bunny’s body or add the family name. It is a simple yet cheerful way to decorate your home for Easter.
The bunny door hanger is lightweight and easy to store. It can be reused each year and updated with new decorations if desired.
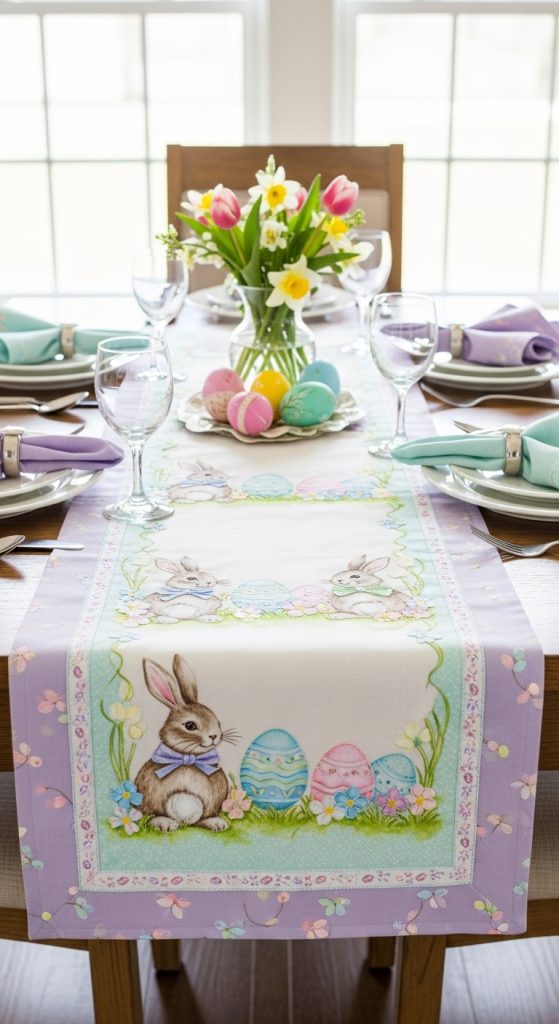
8. Easter Themed Table Runner
An Easter themed table runner is a practical and decorative craft. You will need plain fabric, fabric paint, brushes, stencils, and an iron.
Cut the fabric to fit the length of your table. Hem the edges to prevent fraying. Choose Easter stencils such as eggs, flowers, or bunnies. Place the stencil on the fabric and apply fabric paint using a sponge or brush.
Allow the paint to dry completely before heat setting it with an iron, following the instructions on the paint packaging. This step ensures the design lasts longer and does not fade easily.
The table runner can be placed under your Easter centerpiece or along a side table. It adds color and creativity to your dining setup. You can wash and reuse it for future celebrations.
Making your own table runner allows you to match it with your other decorations. It is a simple sewing and painting project that creates a polished and festive look.
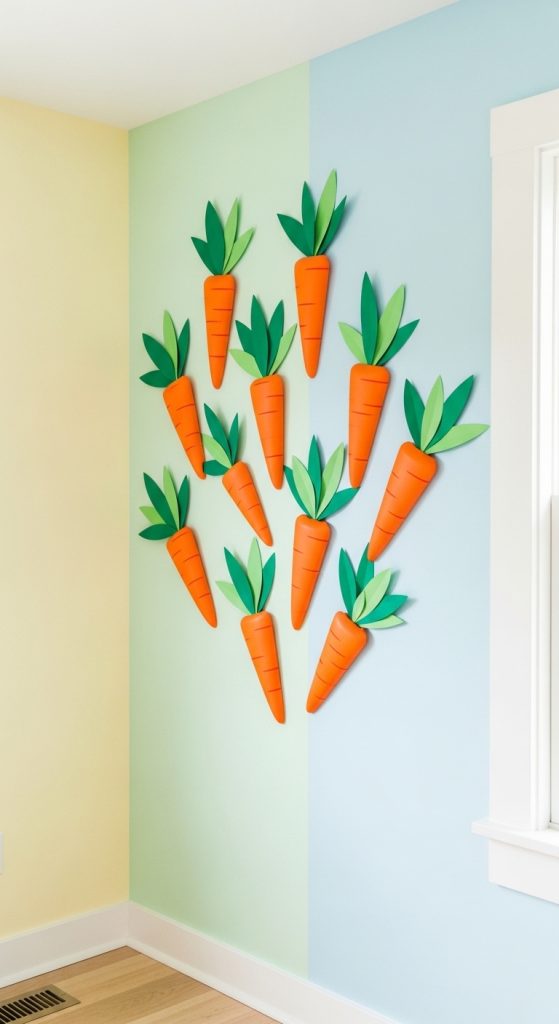
9. Carrot Wall Decorations
Carrot wall decorations are playful and perfect for children’s spaces. For this craft, you will need orange and green construction paper, scissors, glue, and tape.
Cut large carrot shapes from orange paper. Cut thin strips of green paper to create the leafy top. Glue the green strips to the top of each carrot. For extra detail, draw small lines across the carrot body with a darker orange marker.
You can create multiple carrots in different sizes and arrange them on a wall in a fun pattern. Another option is to attach them to a string and create a carrot banner.
This craft is simple and requires minimal materials. It is ideal for classroom decorations or home play areas. Children can safely participate in cutting and gluing with supervision.
Carrot wall decorations add bright color and a playful touch to your Easter theme. They are lightweight and easy to remove after the holiday.
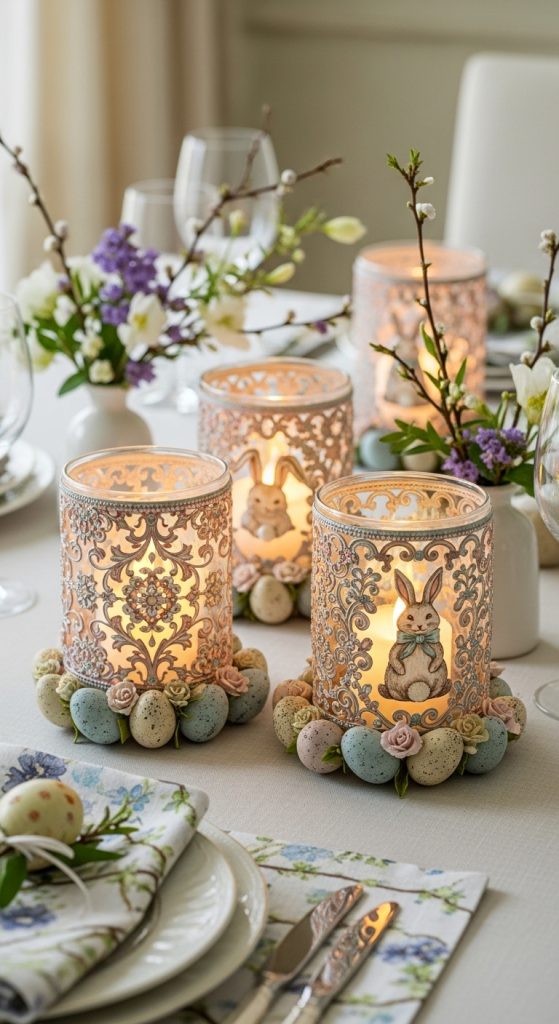
10. Easter Candle Holder Decoration
Decorated candle holders bring elegance to your Easter table. You will need plain glass candle holders, acrylic paint, small decorative eggs, glue, and ribbon.
Paint soft pastel designs on the outside of the glass. Simple flowers, dots, or bunny silhouettes work well. Allow the paint to dry completely. Glue small decorative eggs around the base of the holder for extra detail.
Tie a ribbon around the middle of the holder to create a neat finish. Place an LED candle inside for safety. When lit, the candle highlights the painted patterns and creates a warm glow.
These candle holders are suitable for dinner tables or sideboards. They are easy to customize and can match your overall color theme. Store them carefully after use to enjoy them again next year.
Easter candle holder decorations combine beauty and simplicity. They complete your festive setup and create a peaceful and welcoming atmosphere in your home.