
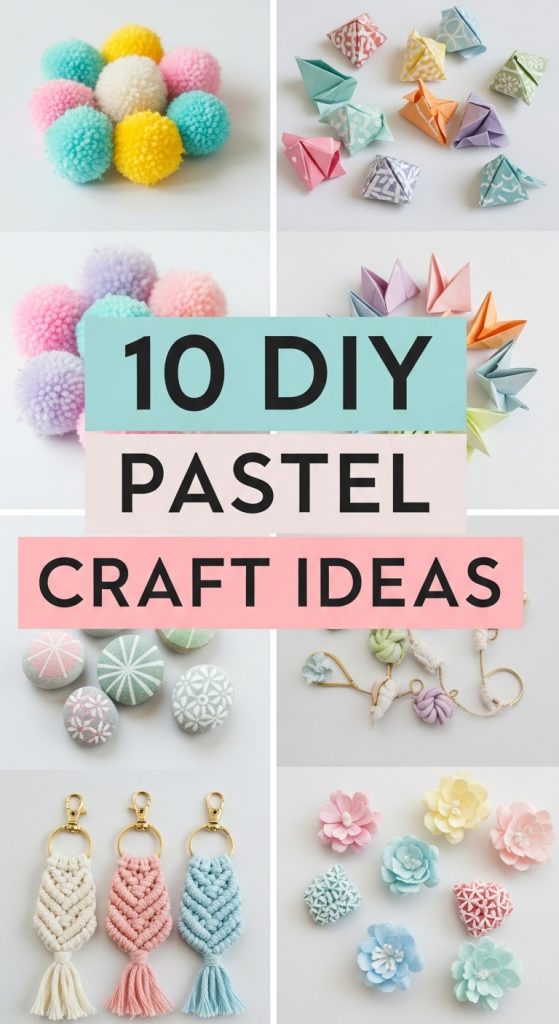
10 DIY Pastel Craft ideas
Pastel colors have become a foundational element in modern crafting and home styling because they bring a soft, calming feel to any project. Whether you enjoy painting, decorating, or making handcrafted items to give as gifts, pastel themed crafts are versatile and approachable even for beginners. The charm of pastel tones is that they make your projects look delicate and refined without requiring advanced artistic skills. This detailed guide covers ten inspiring DIY pastel craft ideas along with preparation, materials, and step by step explanations. Each idea focuses on practical methods and accessible supplies so that hobbyists of all levels can enjoy the creative process. From personalized decor items to functional everyday accessories, these pastel crafts are designed to help you explore your artistic side while enhancing your environment with gentle color palettes. Read through the ideas at your own pace, choose the concepts that fit your personal style, and enjoy a calming and creative crafting experience.
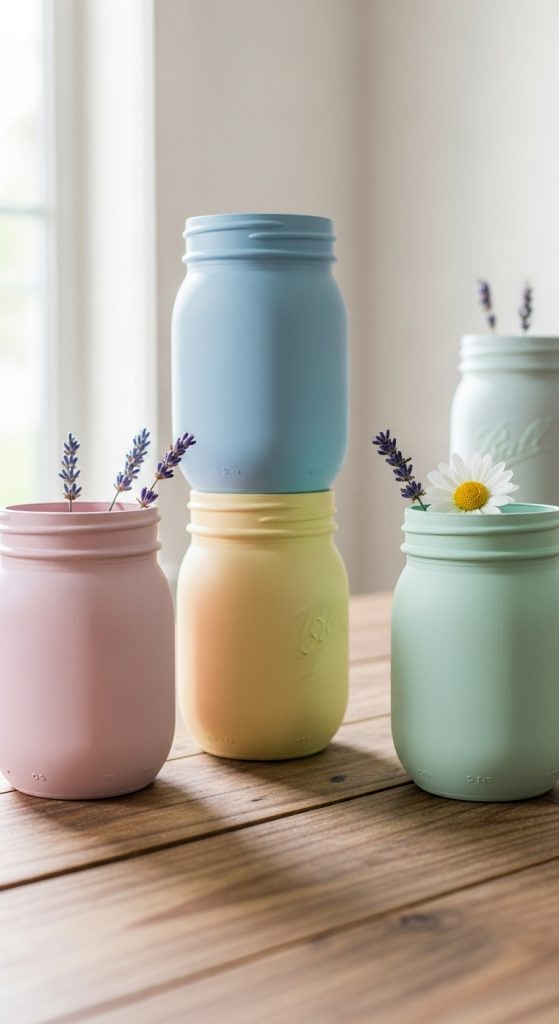
1. Pastel Painted Mason Jars
Pastel painted mason jars are a simple yet charming project that fits into any room decor. To begin, prepare your workspace with a clean table, protective covering, and good lighting. The materials you will need include mason jars, pastel acrylic paints, matte or satin finish sealant, soft brushes, painter tape if you plan to create patterns, and mild soap for cleaning the jars. Start by washing the jar thoroughly and letting it dry completely because any moisture or residue will prevent the paint from adhering properly. Apply the first coat of pastel paint using even strokes. Allow it to dry before adding a second coat to achieve an opaque and smooth surface. If you want to add stripes or geometric shapes, apply painter tape after the first layer dries and paint between the taped sections. Once all layers dry fully, seal the jar using a spray or brush on sealant to protect the finish. These jars can be used as vases, pencil holders, bathroom organizers, or simple decorative pieces. Their soft colors help brighten any space without overwhelming the design. Beginners will find this craft approachable, and experienced crafters can elevate the project by adding texture, gradients, or stenciled illustrations.
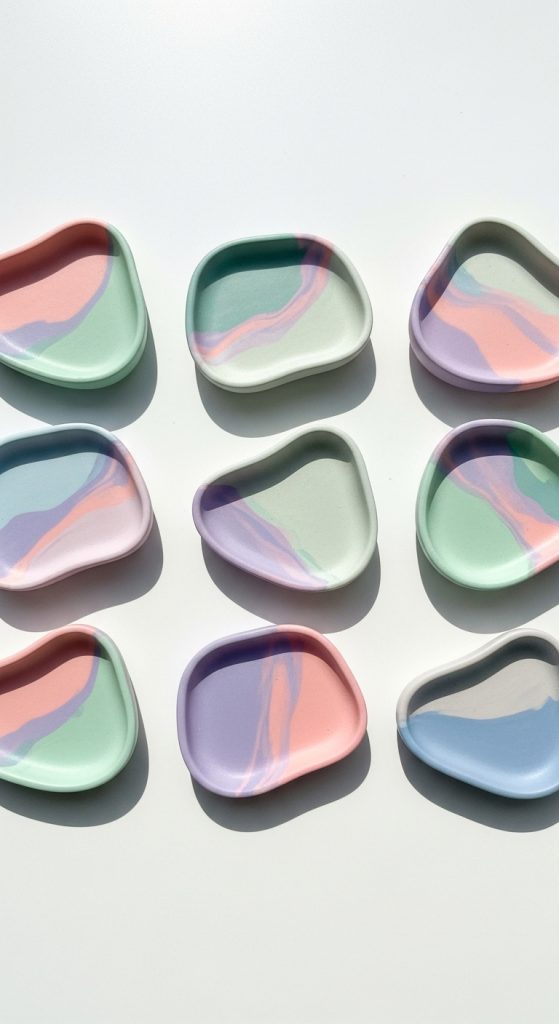
2. Pastel Clay Trinket Dishes
Pastel clay trinket dishes provide a functional and beautiful way to store jewelry, keys, and small accessories. For this project you will need air dry clay or polymer clay, pastel colored pigments or soft tone acrylic paint, rolling tools, a bowl or dish to use as a mold, sandpaper, and a matte sealant. Begin by kneading the clay to warm it and make it easier to shape. Roll it out evenly on a flat surface and press it gently into or over a bowl to create the curved dish shape. Smooth the edges with your fingers or a sculpting tool before letting it dry. Air dry clay will take several hours to harden, and polymer clay will need baking according to the package instructions. Once the dish is fully dry, sand the edges to achieve a polished finish. Add pastel colors either by mixing pigment into the clay beforehand or by painting the dish once it is hardened. Designs could include simple blocks of color, faint marbling, or delicate patterns. Seal the completed piece to protect it from scratches. This craft works well as a personalized gift, and the pastel palette gives each dish a soft and elegant look suitable for bedside tables, dressers, and entryway consoles.
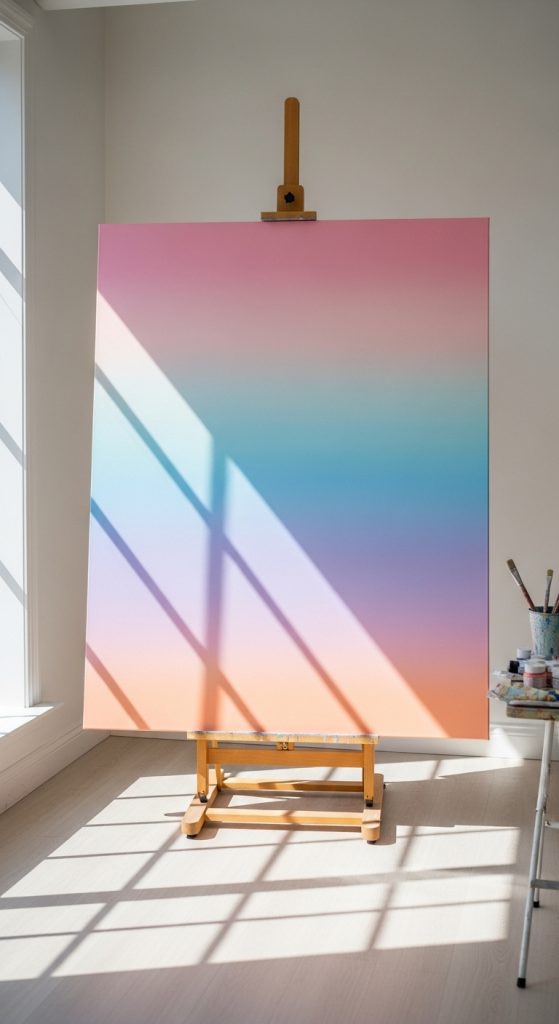
3. Pastel Ombre Canvas Art
Creating pastel ombre canvas art is a relaxing way to incorporate soft gradients into your home decor. Begin by gathering a canvas, pastel acrylic paints, large flat brushes, a spray bottle filled with water, and a mixing palette. Prepare your workspace with a drop cloth and ensure good ventilation. Start by choosing two or three complementary pastel shades and placing them on your palette. Dampen your brush slightly with water to help the paint blend smoothly. Apply the first color at the top of the canvas using broad horizontal strokes. While the paint is still wet, apply the second shade just below the first and gently blend the two together using overlapping brush movements. Continue with additional colors if you want a multi tone ombre effect. The spray bottle can help soften harsh transitions by misting a fine layer of water over the surface, allowing smoother blending. Let the artwork dry completely before hanging it. This project works well as a large statement piece above a bed, sofa, or desk. The beauty of pastel ombre art is its simplicity and calming appearance. It suits minimalist, boho, and modern interior styles and does not require advanced painting skills to achieve visually appealing results.
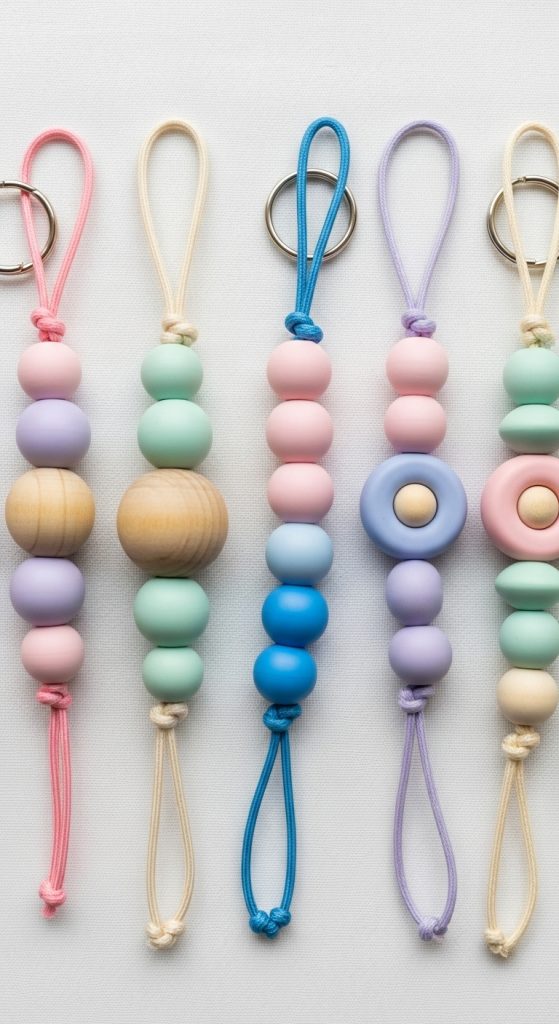
4. Pastel Bead Keychains
Pastel bead keychains are small, customizable, and easy to make. They also serve as thoughtful handmade gifts. For this craft, gather pastel wooden or plastic beads, string or cord, metal key rings, scissors, and optional alphabet beads to personalize the piece. Begin by choosing a color combination that reflects your preferred style. Pastel blues, pinks, yellows, and greens tend to work well together because they share a soft visual tone. Cut a piece of cord long enough to thread the beads and leave extra room for tying knots. Start by weaving the cord through the key ring and securing a double knot. Then add beads in any order you like, creating a symmetrical or random pattern. You can add spacer knots between beads for a more structured appearance. Once your design is complete, tie a firm knot at the end and trim any excess cord. For durability, a small drop of clear craft glue can be applied to the knot. These keychains can decorate bags, zippers, wallets, and backpacks. Because the craft is quick and uses inexpensive materials, it is ideal for group activities, school projects, or handmade gift bundles. The pastel color scheme ensures a gentle and attractive finish.
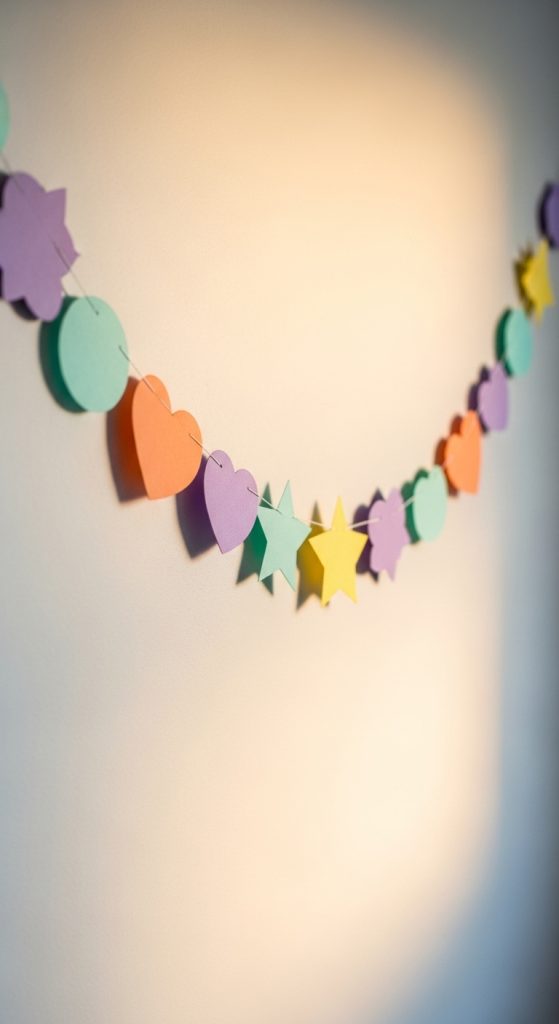
5. Pastel Wall Garland
A pastel wall garland adds a playful touch to any bedroom, nursery, or creative space. To make one, you will need colored pastel cardstock or felt sheets, scissors, string or twine, hole punch tools, and optional wooden beads for accents. Start by selecting the shapes you want for your garland such as circles, stars, flags, or hearts. Trace the shapes onto your chosen material and cut them out neatly. Cardstock offers clean edges, while felt adds a soft and textured look. Use a hole punch to create small openings at the top of each shape so they can be threaded onto the string. Lay out your pieces on a flat surface to decide the order and spacing. Once you are satisfied with the arrangement, thread each shape onto the string, adding wooden beads between pieces if you want extra detail. Tie knots at each end of the garland to prevent slipping. This project is versatile and can be customized in length and complexity. Hang the garland above a bed, across a window, or along a shelf. The gentle tones of pastel colors create a calming environment and make the garland suitable for seasonal decor, photoshoot backdrops, or everyday room styling.
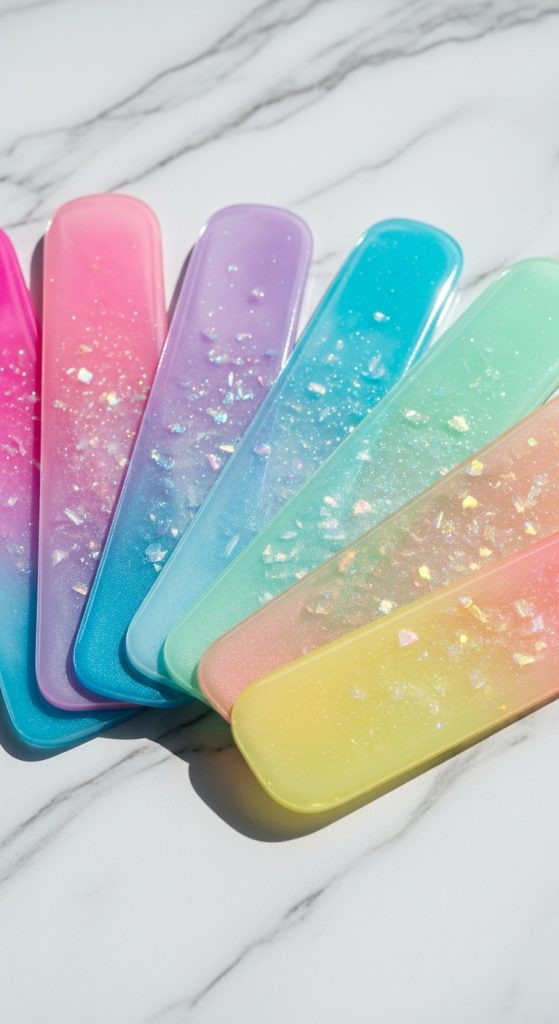
6. Pastel Resin Bookmarks
Pastel resin bookmarks offer a mix of creativity, function, and sophistication. To begin, gather epoxy resin, resin molds shaped like bookmarks, pastel resin pigments, stirring sticks, disposable cups, gloves, and a flat drying area. Prepare the workspace with protective materials since resin can be messy. Follow the instructions for mixing resin and hardener in the correct ratio. Stir slowly to minimize air bubbles. Add pastel pigments or mica powders to achieve your desired color. You may choose a single tone or layered shades for a gradient effect. Pour the resin into the mold slowly to avoid overflow. If bubbles rise to the surface, use a toothpick or a heat tool at a low setting to remove them. Allow the resin to cure for the recommended time, usually up to twenty four hours. Once hardened, remove the bookmark from the mold and sand any rough edges. You may add a ribbon or tassel to the top for decoration. These bookmarks are beautiful gifts for readers and add a gentle pastel touch to notebooks, journals, and planners. Resin crafting requires patience but offers glossy, professional looking results that many crafters enjoy.
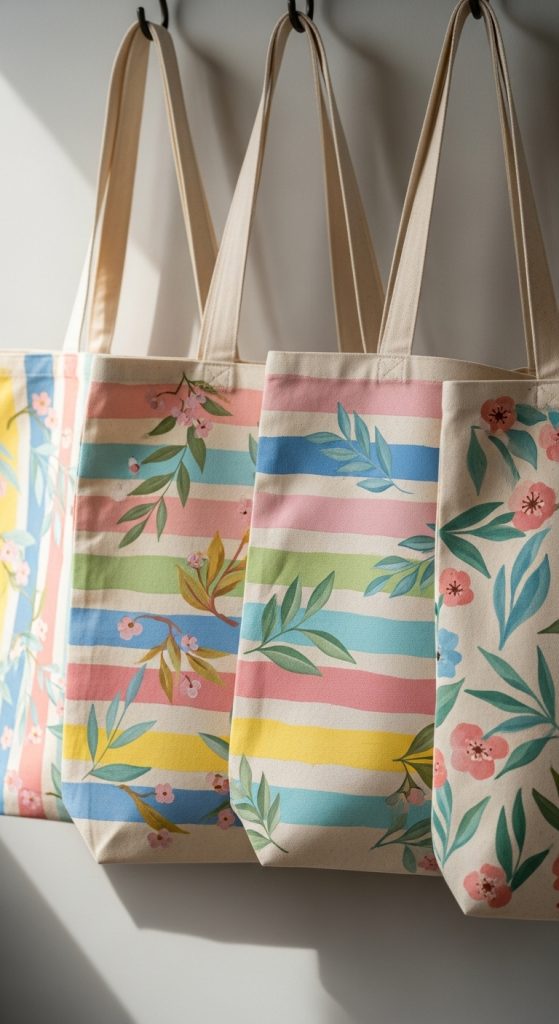
7. Pastel Fabric Painted Tote Bags
Pastel painted tote bags are both stylish and practical. You will need plain canvas tote bags, pastel fabric paints, stencils or masking tape, brushes or sponges, and a piece of cardboard to place inside the bag while painting. Insert the cardboard into the bag to prevent paint from bleeding through. Choose a design, which could include simple stripes, floral accents, geometric shapes, or abstract art. If you prefer sharp edges and clean lines, apply masking tape to define your pattern. For softer designs, use a sponge or soft brush for gentle shading. Apply paint in thin layers to prevent cracking once the fabric flexes. Allow each layer to dry before adding another. After completing the design, let the paint cure fully, usually for twenty four hours. Some fabric paints may require heat setting with an iron, so check the product instructions. The pastel color palette gives the tote a gentle and refined appearance suitable for everyday use. These bags work well for school, shopping, or travel and make excellent personalized gifts. The project is beginner friendly, and the results are durable with proper care.
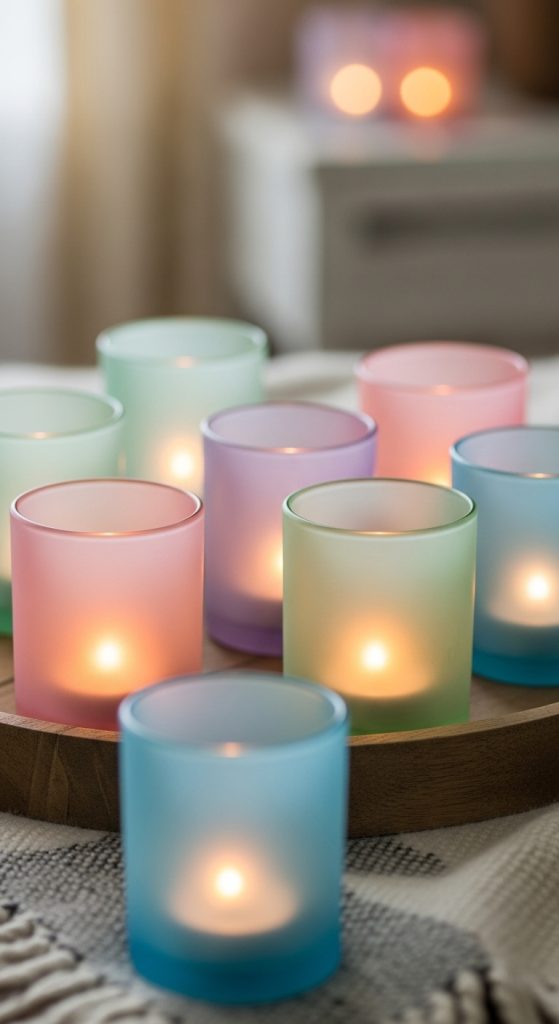
8. Pastel Candle Holders
Pastel candle holders bring soft lighting and subtle color into your living spaces. To create them, gather small glass containers, pastel glass paints or frosted spray paint, brushes, painter tape for patterns, and a sealant suitable for glass. Clean the glass thoroughly to remove fingerprints and dust. Once dry, decide whether you prefer a fully painted surface or a design using negative space. For patterns, apply painter tape in stripes, triangles, or abstract shapes. Paint the open areas with pastel colors using light, even strokes. Glass paint often requires multiple thin layers to achieve smooth coverage. Allow each coat to dry before applying the next. If you prefer a frosted look, use pastel tinted spray paints for a soft diffused effect. After the design is complete and fully dry, seal the candle holder to ensure durability. Place a tea light or LED candle inside. When illuminated, pastel candle holders create a calm and cozy atmosphere ideal for evening relaxation, special occasions, or bedroom decor. This craft is economical and highly adaptable to different shapes and sizes of glass containers, making it easy to create coordinated sets.
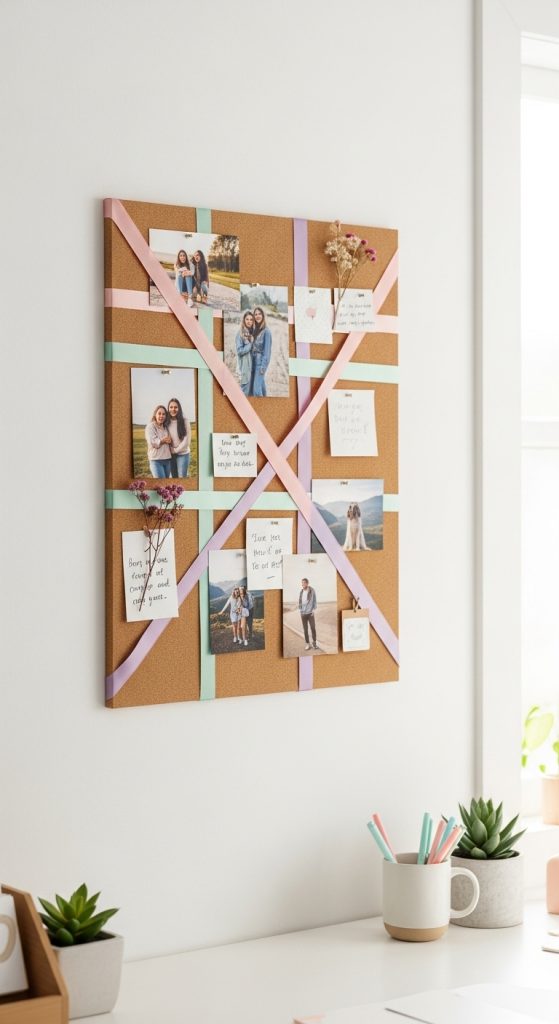
9. Pastel Memory Boards
A pastel memory board helps you display photos, notes, and inspirational messages in a visually appealing way. To make one, gather a cork board or foam board, pastel fabric or paper, adhesive spray or glue, ribbons, push pins, and scissors. Begin by cutting your fabric or paper so it overlaps the edges of the board. Secure it tightly with adhesive, smoothing out any wrinkles. Choose complementary pastel ribbons and arrange them across the board in a crisscross or horizontal pattern. Secure the ribbon ends at the back using glue or pins. The ribbons will serve as holders for photos and small papers. For additional decoration, use pastel painted push pins to attach items directly to the board. Memory boards can also include small embellishments such as lace strips, buttons, or pre cut labels in soft tones. Hang the completed piece on a wall or stand it on a desk where you can easily update the displayed content. This craft allows for sentimental personalization and works well for bedrooms, study areas, or offices. Pastel colors provide a clean and calming aesthetic that encourages creativity and focus.
10. Pastel Flower Shadow Boxes
Pastel flower shadow boxes are elegant decorative pieces that add depth and artistry to any room. You will need a shadow box frame, pastel artificial flowers, cardstock for backing, scissors, a glue gun, and optional decorative elements like pearls or ribbons. Start by removing the backing of the shadow box and covering it with pastel cardstock. This ensures a consistent color theme and a clean background. Trim the artificial flowers so the stems fit comfortably inside the box. Arrange the flowers on the cardstock before gluing them to make sure the layout feels balanced. You may choose a single type of flower or mix roses, daisies, and peonies in complementary pastel tones. After securing the arrangement with hot glue, allow it to dry completely. Add small accents if desired, but avoid overcrowding the composition. Place the glass front back onto the shadow box and ensure it closes securely. These shadow boxes work beautifully as wall art or tabletop decor. They also make meaningful handcrafted gifts for birthdays, weddings, and special events. Their pastel palette creates a soothing and romantic atmosphere while showcasing the dimensional beauty of preserved floral arrangements.
