
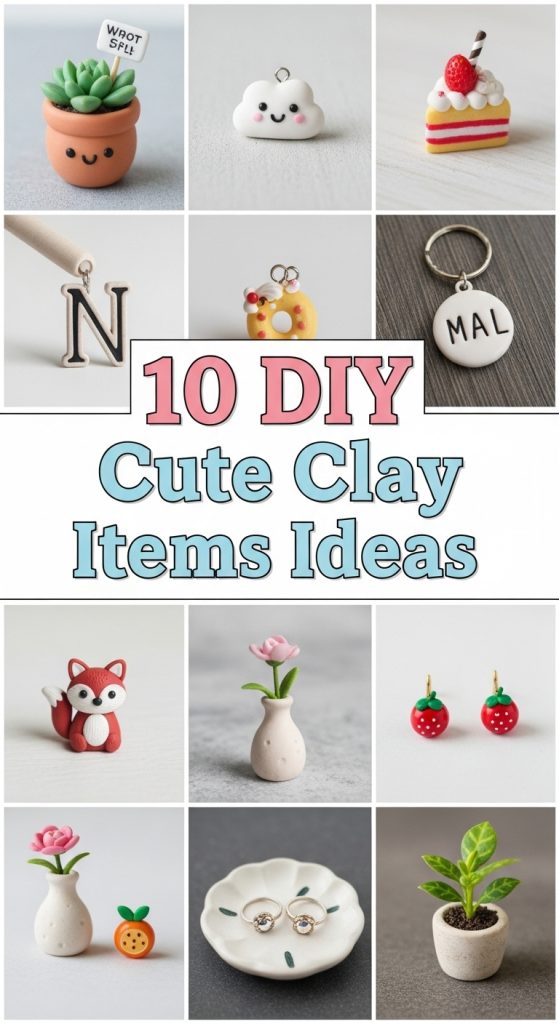
10 DIY Cute Clay items ideas
Clay crafting is one of the most enjoyable and accessible creative hobbies today. Whether you use air dry clay, polymer clay, or homemade clay, the material allows endless imagination. You can create functional items, decorative accents, or simply cute miniature pieces that spark joy. This detailed guide shares ten adorable clay project ideas, along with preparation steps, materials needed, and practical tips for beginners and experienced crafters. Every idea is explained in depth so you understand the techniques, styling choices, and finishing touches needed to make each project shine.
Preparation Before You Start
Before working on the individual projects, it is important to prepare your tools and workspace. A clean, flat, non sticky surface such as a silicone mat or a smooth tile is ideal. Always keep your clay wrapped or stored in an airtight container when not in use to prevent drying. Wash your hands before handling clay so oils or dust do not affect the texture. If using polymer clay, preheat the oven according to the package instructions. If using air dry clay, prepare a plastic wrap to cover your project during breaks to prevent cracks. Basic tools like a rolling pin, craft knife, dotting tools, texture sheets, and a soft brush for smoothing will make the crafting process much easier.
1 Miniature Clay Animals
Creating miniature animals is a timeless favourite among clay lovers. These tiny figures are simple, cute, and perfect for decorating shelves, gifting, or using as desk companions. To begin, choose soft air dry or polymer clay in colours that match your chosen animal. Roll small shapes such as spheres and cones to create the head, body, ears, and limbs. The key is proportion and simplicity, because cuteness often comes from round shapes and minimal features. Use a dotting tool or toothpick to form eye sockets or indentations. For details like eyes or noses, you can use tiny clay pieces or paint them after the clay is fully cured. If you want added charm, incorporate small accessories like bows or hats. After shaping, smooth the surface with a slightly damp brush. Let air dry clay cure for at least twenty four hours or bake polymer clay following the instructions. You can apply a matte or glossy varnish to protect the mini figures. This project teaches you precision and patience while still being beginner friendly.

2 Clay Trinket Dishes
Clay trinket dishes look elegant yet are easy to make. They can hold jewellery, keys, hair accessories, or small workspace items. To begin, roll out your clay into an even sheet. Use a circular object like a bowl or lid to cut a perfect round shape. Gently lift the clay circle and place it inside a shallow bowl to create a curved form. This helps the dish take on a natural, smooth shape while drying or baking. For decoration, you can press textured leaves, lace, or stamps into the clay before shaping. You can also create marbled patterns by twisting two colours together. For a minimal look, leave the clay plain and paint the rim with metallic paint once cured. Make sure edges are smooth by running a damp finger along them. Air dry clay will need at least a full day to harden, while polymer clay requires baking. Once cured, sand any rough edges lightly and apply a waterproof seal if you want to use the dish for slightly wet items. These trinket dishes are perfect handmade gifts and add charm to dressers or bedside tables.

3 Clay Flower Magnets
Clay flower magnets are a joyful way to brighten your refrigerator, magnetic board, or office space. Start by choosing bright clay colours that represent your favourite flowers. Roll out small petals, each shaped like a teardrop or rounded triangle depending on the flower type. Arrange the petals tightly around a centre sphere and gently press them together. You can create daisies, roses, tulips, or abstract floral designs. Use a shaping tool or toothpick to add gentle lines or texture on the petals for authenticity. Once your flower is complete, attach a flat clay backing so the magnet can be glued securely once the clay is cured. Bake or air dry according to the clay type. After curing, use a strong craft adhesive to attach a small magnet to the back. For a glossy finish, coat the flower with a clear varnish. These magnets make excellent personalised gifts and allow you to explore colour combinations and petal techniques. You can create entire sets that match your kitchen theme or seasonal designs like spring blossoms or autumn flowers. This project is easy yet boosts your attention to detail.

4 Cute Clay Bookmarks
Clay bookmarks offer a creative way to encourage reading and add personality to your favourite books. Begin with a flat strip of polymer or air dry clay, rolled evenly to a medium thickness. Shape the top portion into a character or object, such as a cat face, fruit, cartoon cloud, or plant motif. The design should be simple but expressive. You can use clay tools to define eyes, blush marks, or leaf veins. Make sure the lower part of the bookmark stays thin and flat so it fits comfortably between book pages without causing damage. Smooth all edges thoroughly. If using polymer clay, bake the bookmark while lying flat on parchment paper to prevent warping. If using air dry clay, place a lightweight object on top to maintain flatness during drying. Once cured, paint details like eyes, stripes, or patterns to make the bookmark more vibrant. Seal with a matte varnish to protect the paint. Clay bookmarks can be custom made for children, teachers, or anyone who loves reading. They are fun to make, functional, and allow endless variations.

5 Clay Pendant Necklaces
Clay pendants are lovely accessories that let you express your personal style. Start by conditioning your clay until it becomes soft and easy to shape. Use cookie cutters or hand shape a pendant form such as a heart, flower, moon, or geometric shape. Experiment with layering colours, creating marbled effects, or carving patterns into the surface. Use a skewer or straw to make a hole for the necklace cord before curing. If you prefer fine details such as tiny flowers, stars, or lace texture, press them onto the pendant surface before baking or drying. After curing, sand the edges lightly for a polished finish. You can paint patterns, add gold accents, or leave the pendant in its natural clay colour for a minimal aesthetic. Seal with a varnish for durability. Thread a leather cord, satin ribbon, or metal chain through the hole to create a wearable accessory. Clay pendants make unique gifts and are ideal for craft fairs or online shops. This project teaches basic jewellery making and decorative engineering while allowing full creative freedom.

6 Mini Clay Succulents
Miniature succulents made from clay are adorable, durable, and do not require watering. To start, roll green clay into small cone shaped leaves. Attach these leaves around a central base, gradually building layers upward. You can create rosette shapes like echeveria or spiky forms like aloe and agave. Add soft colour gradients by mixing clay tones such as mint, forest green, or pastel pink. For added realism, use a pointed tool to add texture lines to each leaf. Once the succulent is shaped, create a miniature pot using brown or terracotta coloured clay. Form a small cylinder and hollow it slightly. After shaping both pot and plant, secure the succulent inside the pot using extra clay. Bake or air dry according to your clay type. Once cured, paint small details such as soil texture or highlight edges. Clay succulents are perfect for workspace decor, dollhouses, or gifting. They also develop your sculpting skills and teach you how to assemble layered structures. Beginners enjoy this project because it is easy yet visually rewarding.

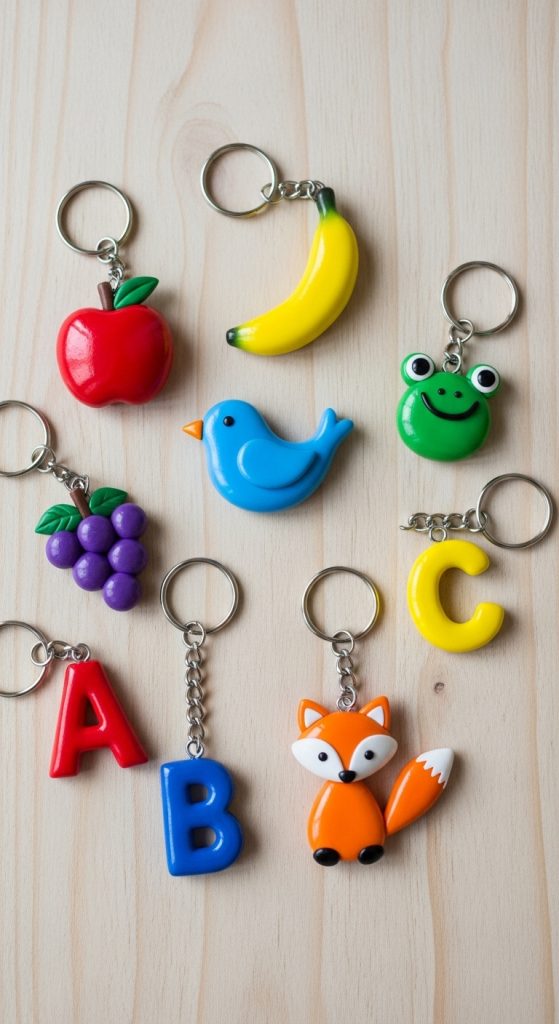
7 Clay Keychains
Clay keychains are practical, fun, and allow endless customisation. Begin by deciding on a simple design that can withstand daily use. Common themes include initials, fruit shapes, miniature animals, or minimal geometric forms. Shape your clay carefully and make sure all pieces are solidly attached to prevent breakage. Use a straw, needle, or skewer to create a clean hole for the keychain ring. Bake or air dry as required. Once cured, sand any rough edges and paint fine details such as outlines, patterns, or highlights. Seal the keychain with a waterproof varnish to protect the paint from friction and moisture. Attach a metal keychain ring or lobster clasp through the hole. Clay keychains can be personalised for friends, birthdays, or events. They are ideal for small business owners who want to sell lightweight, affordable items. This project teaches you how to balance both durability and design while keeping your clay item functional for everyday use.
8 Clay Pen or Pencil Toppers
Clay toppers transform ordinary stationery into cute personalised tools. Start by choosing a simple design that will fit securely on the upper end of a pen or pencil. Shape clay characters like animals, fruit, miniature landscapes, or simple shapes like stars or hearts. Make a hollow base by inserting the pencil tip into the clay while shaping the topper, then removing it to leave a clean cavity. This ensures the topper fits properly. Add surface details using clay tools to create texture and expression. Bake or dry the topper based on your clay type. Once cured, paint any additional designs and seal with varnish. When finished, gently slide the topper onto your pen or pencil. These toppers work wonderfully as gifts for children, students, or office colleagues. They create a sense of personal ownership and make workspaces more cheerful. This project helps you practice hollow shaping techniques and teaches proper sizing methods.

9 Clay Candle Holders
Handmade clay candle holders add charm and warmth to any space. Begin with a sturdy clay that can withstand heat if you plan to use real candles. Shape a small bowl, cylinder, or decorative form that holds a tealight or taper candle securely. Smooth the edges and ensure the base is flat so the holder stands safely. Add texture using leaves, stamps, or pressed fabric patterns. You can also incorporate cutout designs or layered clay accents for visual depth. Let air dry clay cure completely or bake polymer clay as instructed. After curing, paint the candle holder in soothing colours such as cream, olive, or soft brown. Seal with a heat resistant varnish if available. These candle holders are excellent additions to living rooms, dining spaces, or festive decor. This project teaches you stability, weight balance, and texturing skills while still being accessible for beginners.

10 Clay Letter Nameplates
Clay nameplates add a personalised touch to desks, bedroom doors, study spaces, and gift presentations. Start by rolling out clay and cutting individual letters using stencils or cutters. If you prefer hand sculpting, shape each letter carefully and maintain consistent thickness. Arrange the letters on a clay base or mount them upright using extra support clay at the back. Smooth all edges and ensure the nameplate is straight and balanced. You can decorate the letters with patterns, miniature flowers, dots, or carved lines. Bake or let the clay air dry completely. After curing, paint the nameplate to match your theme, whether pastel, bold, or monochrome. Seal with varnish to protect the colours. This project helps develop precision and letter shaping skills. It is versatile, suitable for children, personalised gifting, or decorating workspaces. Clay nameplates highlight craftsmanship and serve as long lasting customised decor.
